 Wall Of Fame
 Members Blogs
 Top Rated Posts
 Recent Topics
 Live Scanners
 Pop Up Radio
 Disaster Map
 Gear Reviews
 Economy Watch
 Survival Apps
 NOAA Radio
 Distressed Communities
 Live Radar
 Weather Station
 Ask The 8Ball
 Recipes Roll
 Meal Planner
 Debt Clock
 ZDAY Quiz
 Chess Game
 The Bible
 Religions Map
 View Calendar
 KY Events Wall
State Bicycle x NFL: Rep Your Team With Bikes, Jerseys, and Bags
State Bike Co. kicks off its NFL collection with team-themed bikes, three-pocket jerseys, frame bags, and more.

Recent posts
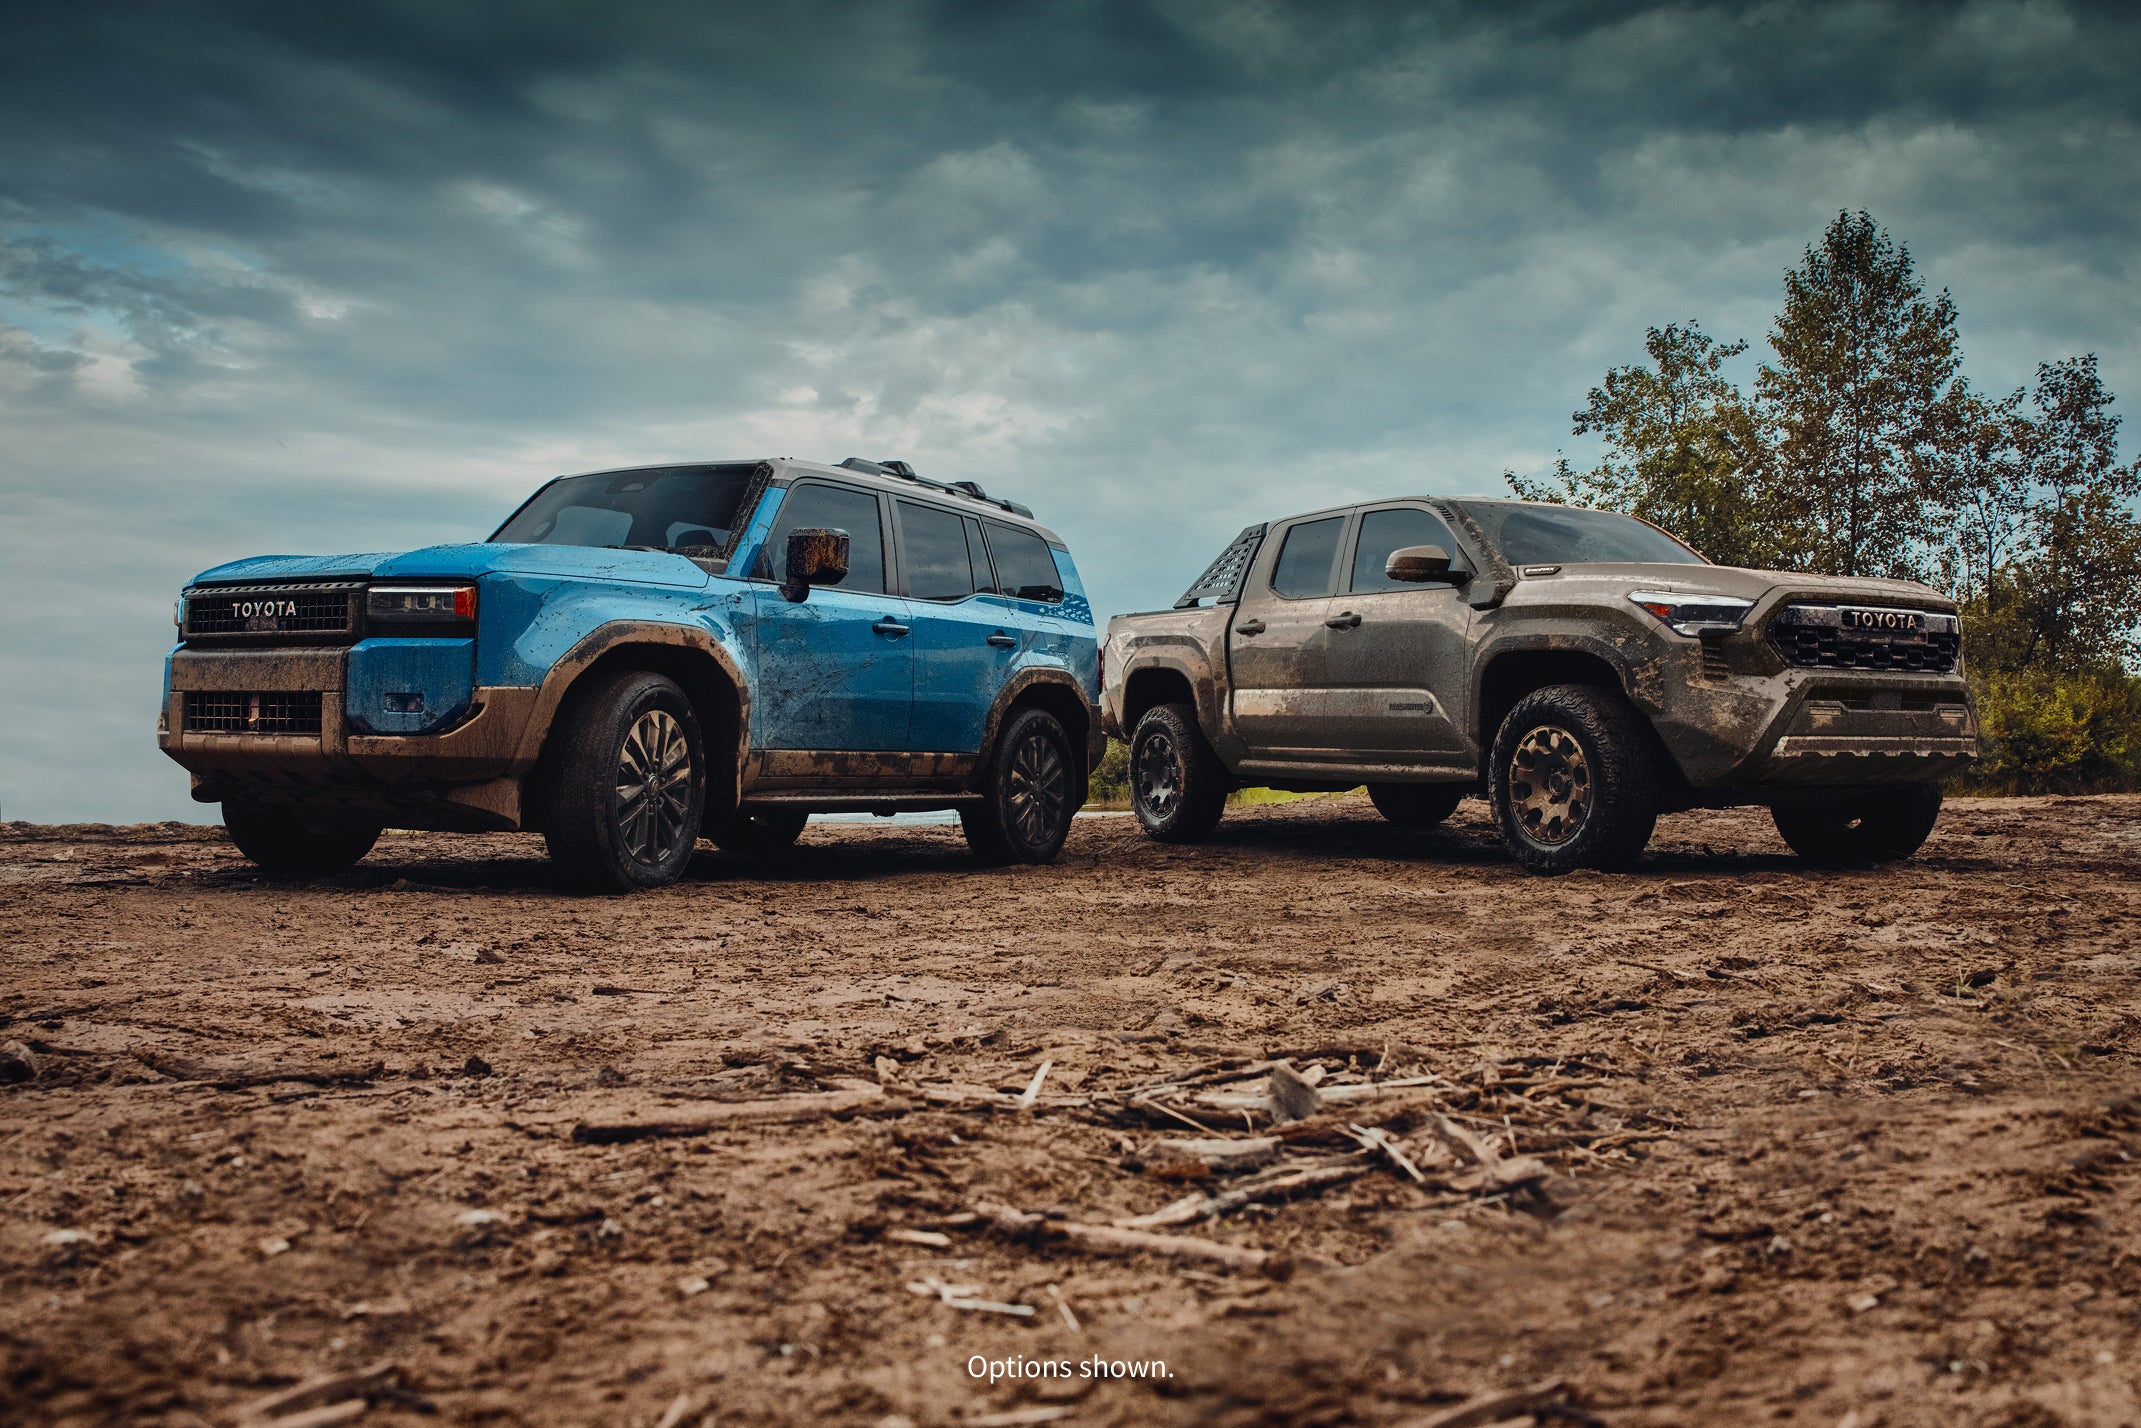
This article is sponsored and made possible by Toyota Trucks.
As crowds taper off in fall and winter, wildlife becomes easier to spot at many national parks. This season invites unhurried exploration, and travelers we call Detourists are the ones who embrace it. They're the ones who take the long way and find beauty off the beaten path.
With the capability and reliability of Toyota Trucks, every trip becomes an open invitation to explore. From gravel loops and muddy forest roads to snow-covered backroads in the Badlands, this season can bring changing, and sometimes challenging road conditions. But for those ready to explore, it also offers some of the best wildlife watching of the year.
Here are three national parks and monuments where wildlife takes the spotlight in colder months, and how best to explore them.
Every November, the skies above Bosque del Apache fill with sandhill cranes and snow geese. Their calls echo across the wetlands as dawn breaks over the desert. The refuge's 12-mile auto loop offers easy access to viewing areas and hidden pullouts ideal for photography.
The Toyota Tundra TRD Pro handles the gravel and levee roads with ease. Its high-clearance suspension and 4×4 hybrid drivetrain make pre-dawn starts and post-sunset exits worry-free. The aluminum-reinforced composite bed doubles as a viewing platform or gear station, ready for tripods, binoculars, and coffee.
Tip: Dress in layers, as mornings can be below freezing, and stay for the evening "fly-in" when thousands of cranes return at sunset.
In fall, Congaree's old-growth forest comes alive. Otters glide through blackwater creeks, barred owls call from above, and deer step out as floodwaters recede. Fewer visitors make it an ideal time to explore.
The Toyota Tacoma TRD Off-Road shines on the park's sandy forest roads and muddy pullouts. Its standard 4×4 drivetrain and Crawl Control systems help navigate slick ground, and the truck bed easily hauls camera gear or a kayak for exploring Cedar Creek.
Tip: Visit early morning or after rain for a calm atmosphere and active wildlife. A headlamp helps spot nocturnal movement after dusk.
During fall and winter, bison graze across the badlands, wild horses roam the ridges, and elk bugle in the distance.
Unpaved routes through the North and South Units are where the Toyota 4Runner TRD Pro proves its worth. Its 4×4 hybrid drivetrain system and rugged suspension handle washboard terrain and steep grades with confidence. The roomy cargo area and liftgate with power rear window make it easy to gear up, rest, or warm up between sightings.
Tip: Visit between late September and November for active herds and the park's best light for photography.
Wildlife watching requires patience and preparation. Toyota Trucks provide both mobility and comfort, with space for cameras, coolers, binoculars, field books, and more. Use the bed for a stable shooting platform, and let the truck's traction and clearance handle the rough roads so you can focus on the view.
Remember to observe wildlife from a distance, stay on designated roads, and never feed or approach wildlife. Pack out all trash, respect seasonal closures, and minimize noise.. This means that you should also avoid using any bird calls or apps that imitate animal sounds. Mimicking animal sounds is considered harassment and can harm wildlife.
This season, be a Detourist and take the long way. Choose the quieter overlooks, the open roads, and the trails where it's just you and the wild. With a Toyota Truck, you can get there, and you can stay as long as you want.
The post National Parks Where Wildlife Takes Center Stage appeared first on The Dyrt.
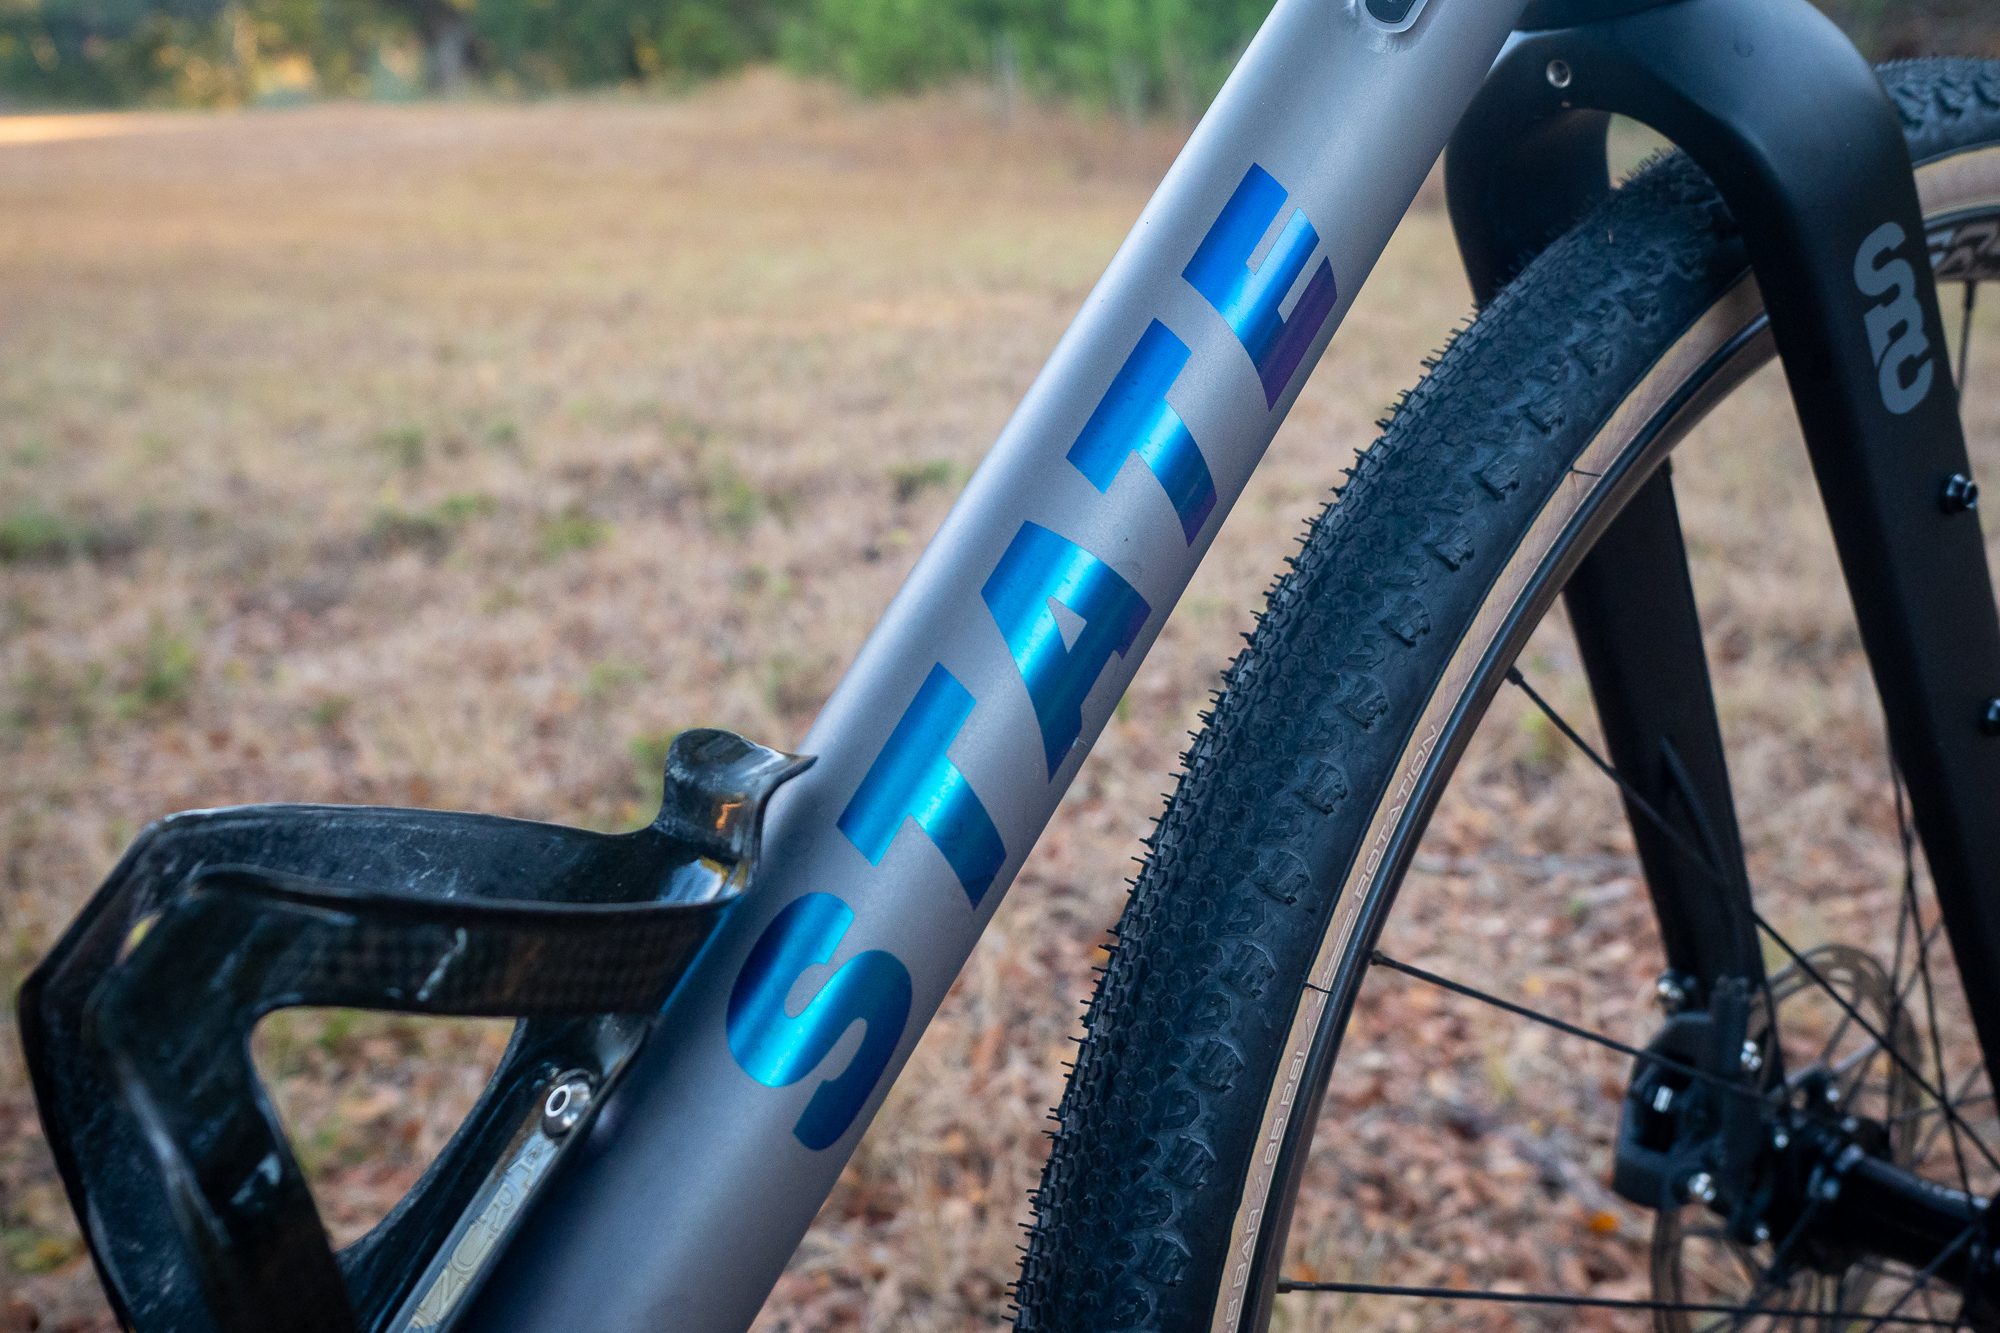
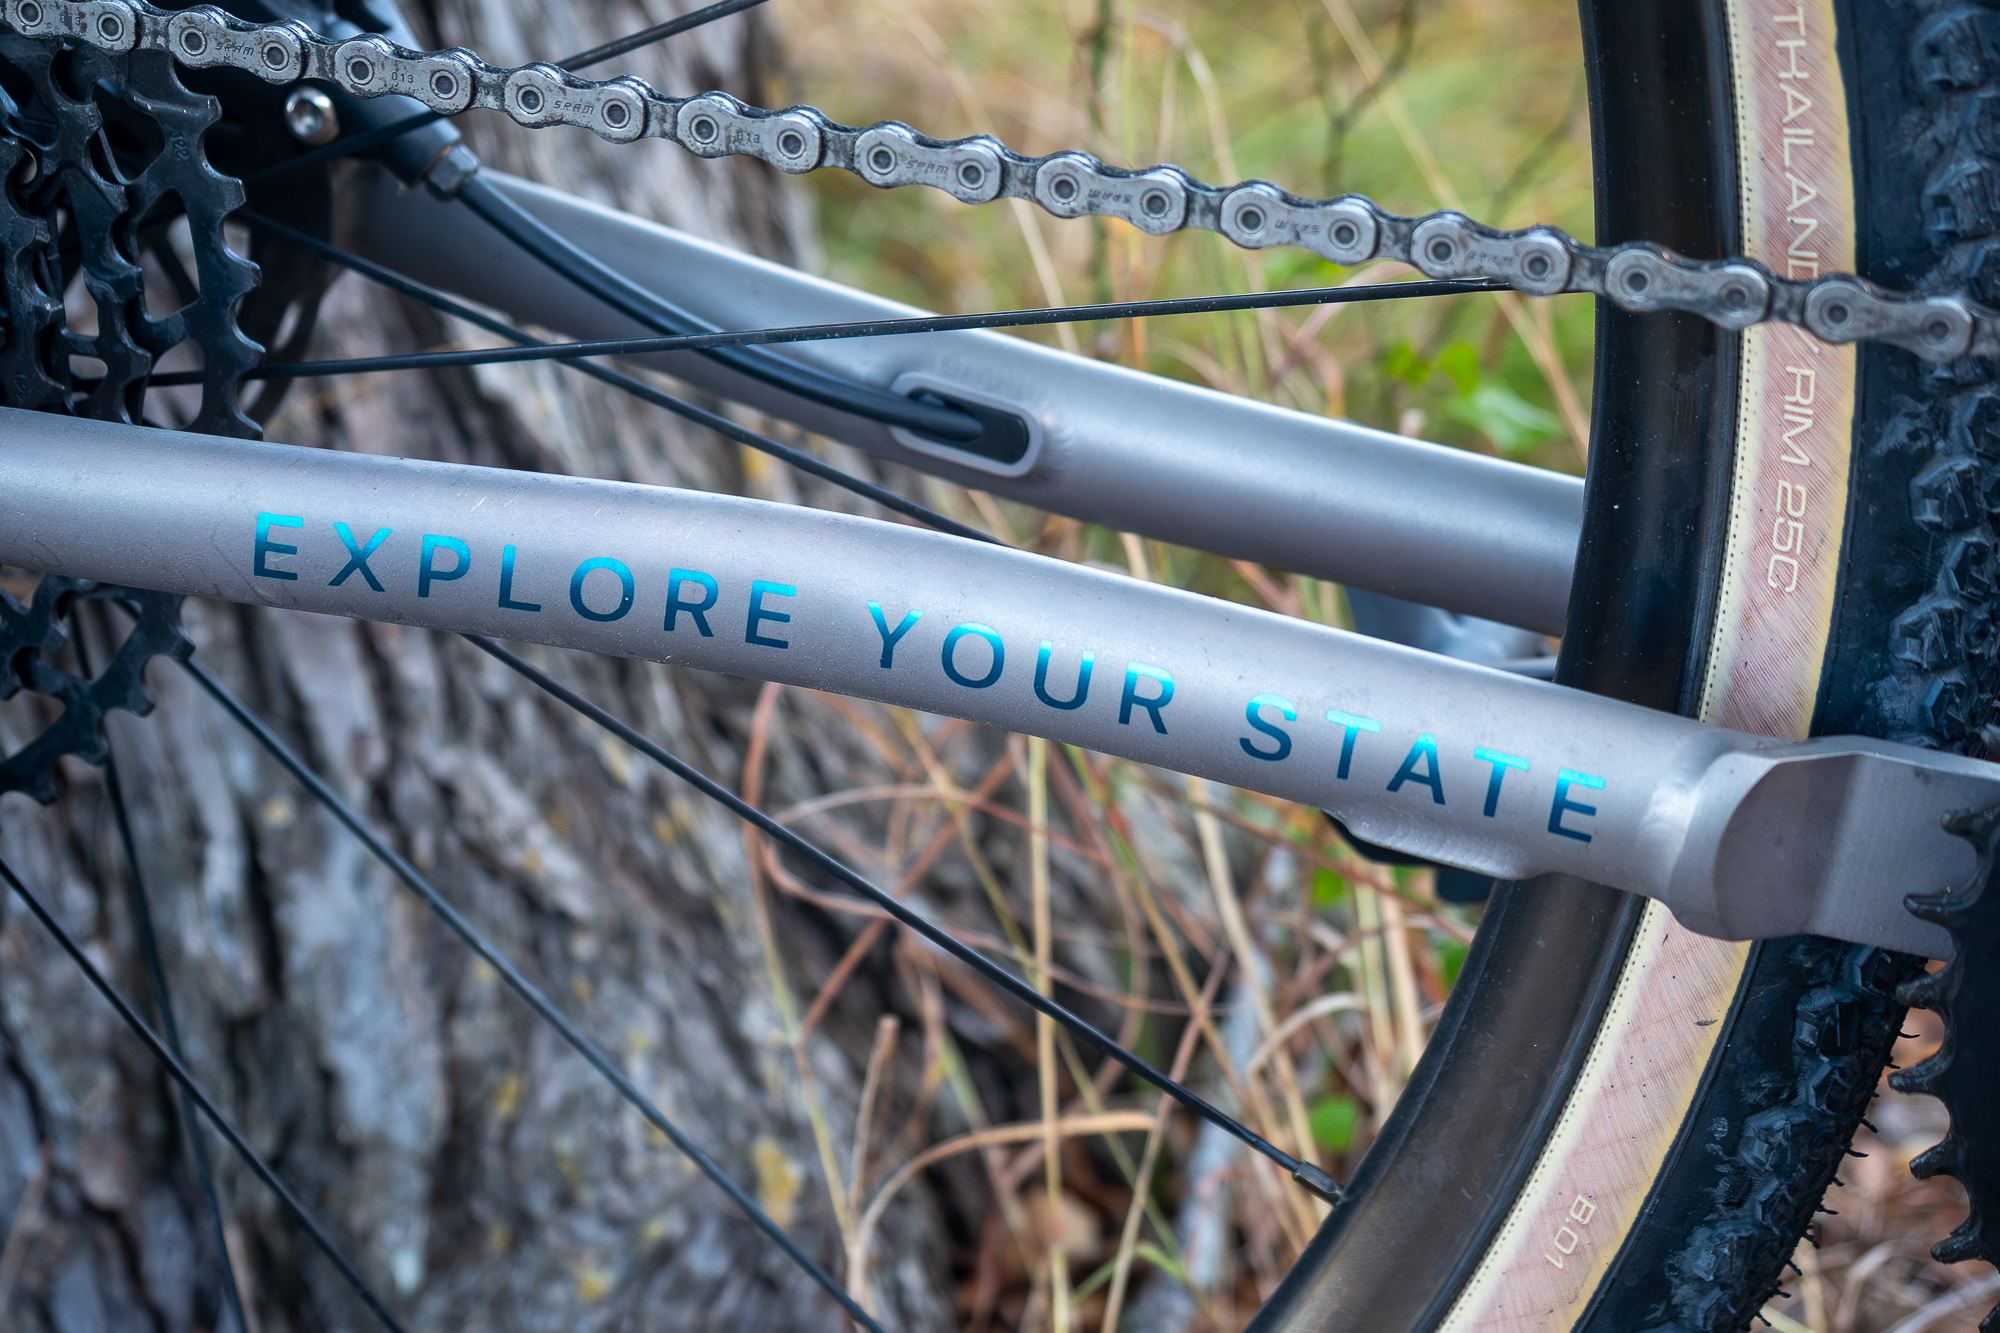
Since launching in 2009, State Bicycle Co. has carved out a reputation for delivering functionality without fluff. Launched this year, the Titanium All-Road certainly fits that bill — quiet and unremarkable, other than the iridescence of its State logos.
Still fun as hell, though.
Bombing the first descent. Air roaring past my ears. Rocks pinging off the downtube at 30+ mph. Teeth clenched, bike launching off square edges, bottles launched. I didn’t once think about the bike.
Turned around, hopped off to get my bottles. Didn’t look at the frame for paint chips or cracks.
Three hours later, I still hadn’t.
In short: This bike is for riders who don’t care about status, tech, or aero. They just want to ride — and keep riding for years without thinking about it. It’s not the crème de la crème, but as a stepping stone into high-end builds, it’s a solid option.
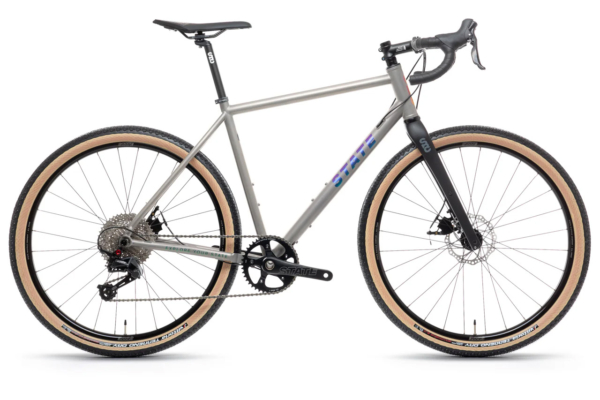
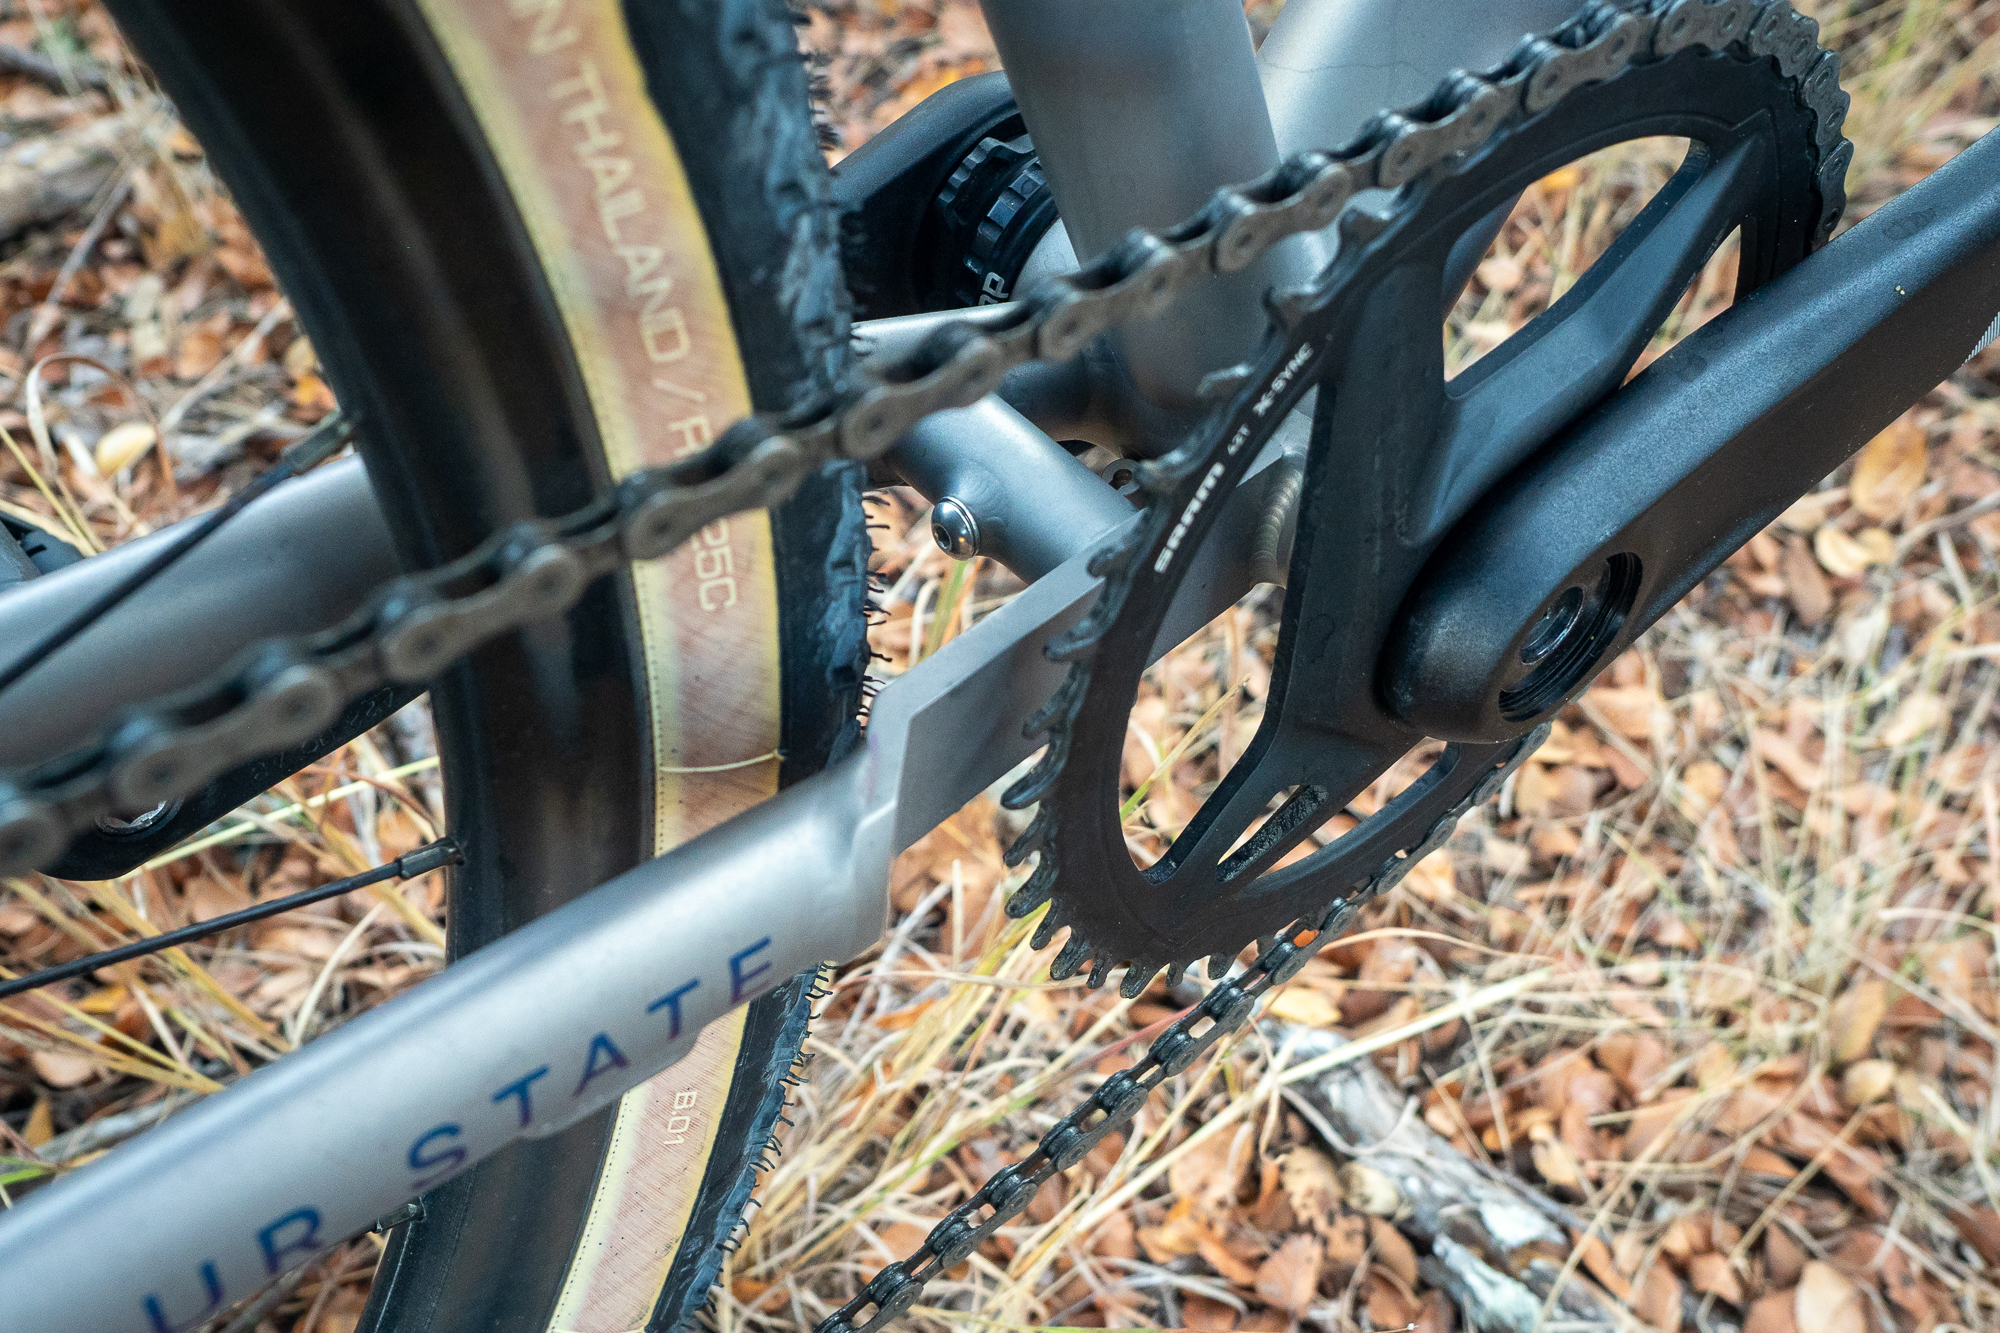
My test State Bicycle Co. Titanium All-Road tester was the top spec: carbon fork, ENVE AG25 wheels, and SRAM Apex XPLR AXS groupset, totaling $4,400.
But there are lower-priced versions — complete State Bicycle Co. Titanium All-Road builds start at just $2,500, with frames available for $1,300 — those numbers for a Ti bike sound fake to those who have been around a bit.
To put that in perspective, a bare Litespeed Flint titanium frame costs $2,399. You can get a complete, rideable State Bicycle Co. Titanium All-Road for barely more than what competitors charge for just the frame.
The State Bicycle Co. Titanium All-Road doesn't hide behind marketing flash: Utilitarian welds, not an aero shape in sight, and value-oriented spec and house-branded components define this machine. But the frame boasts legitimate specs.
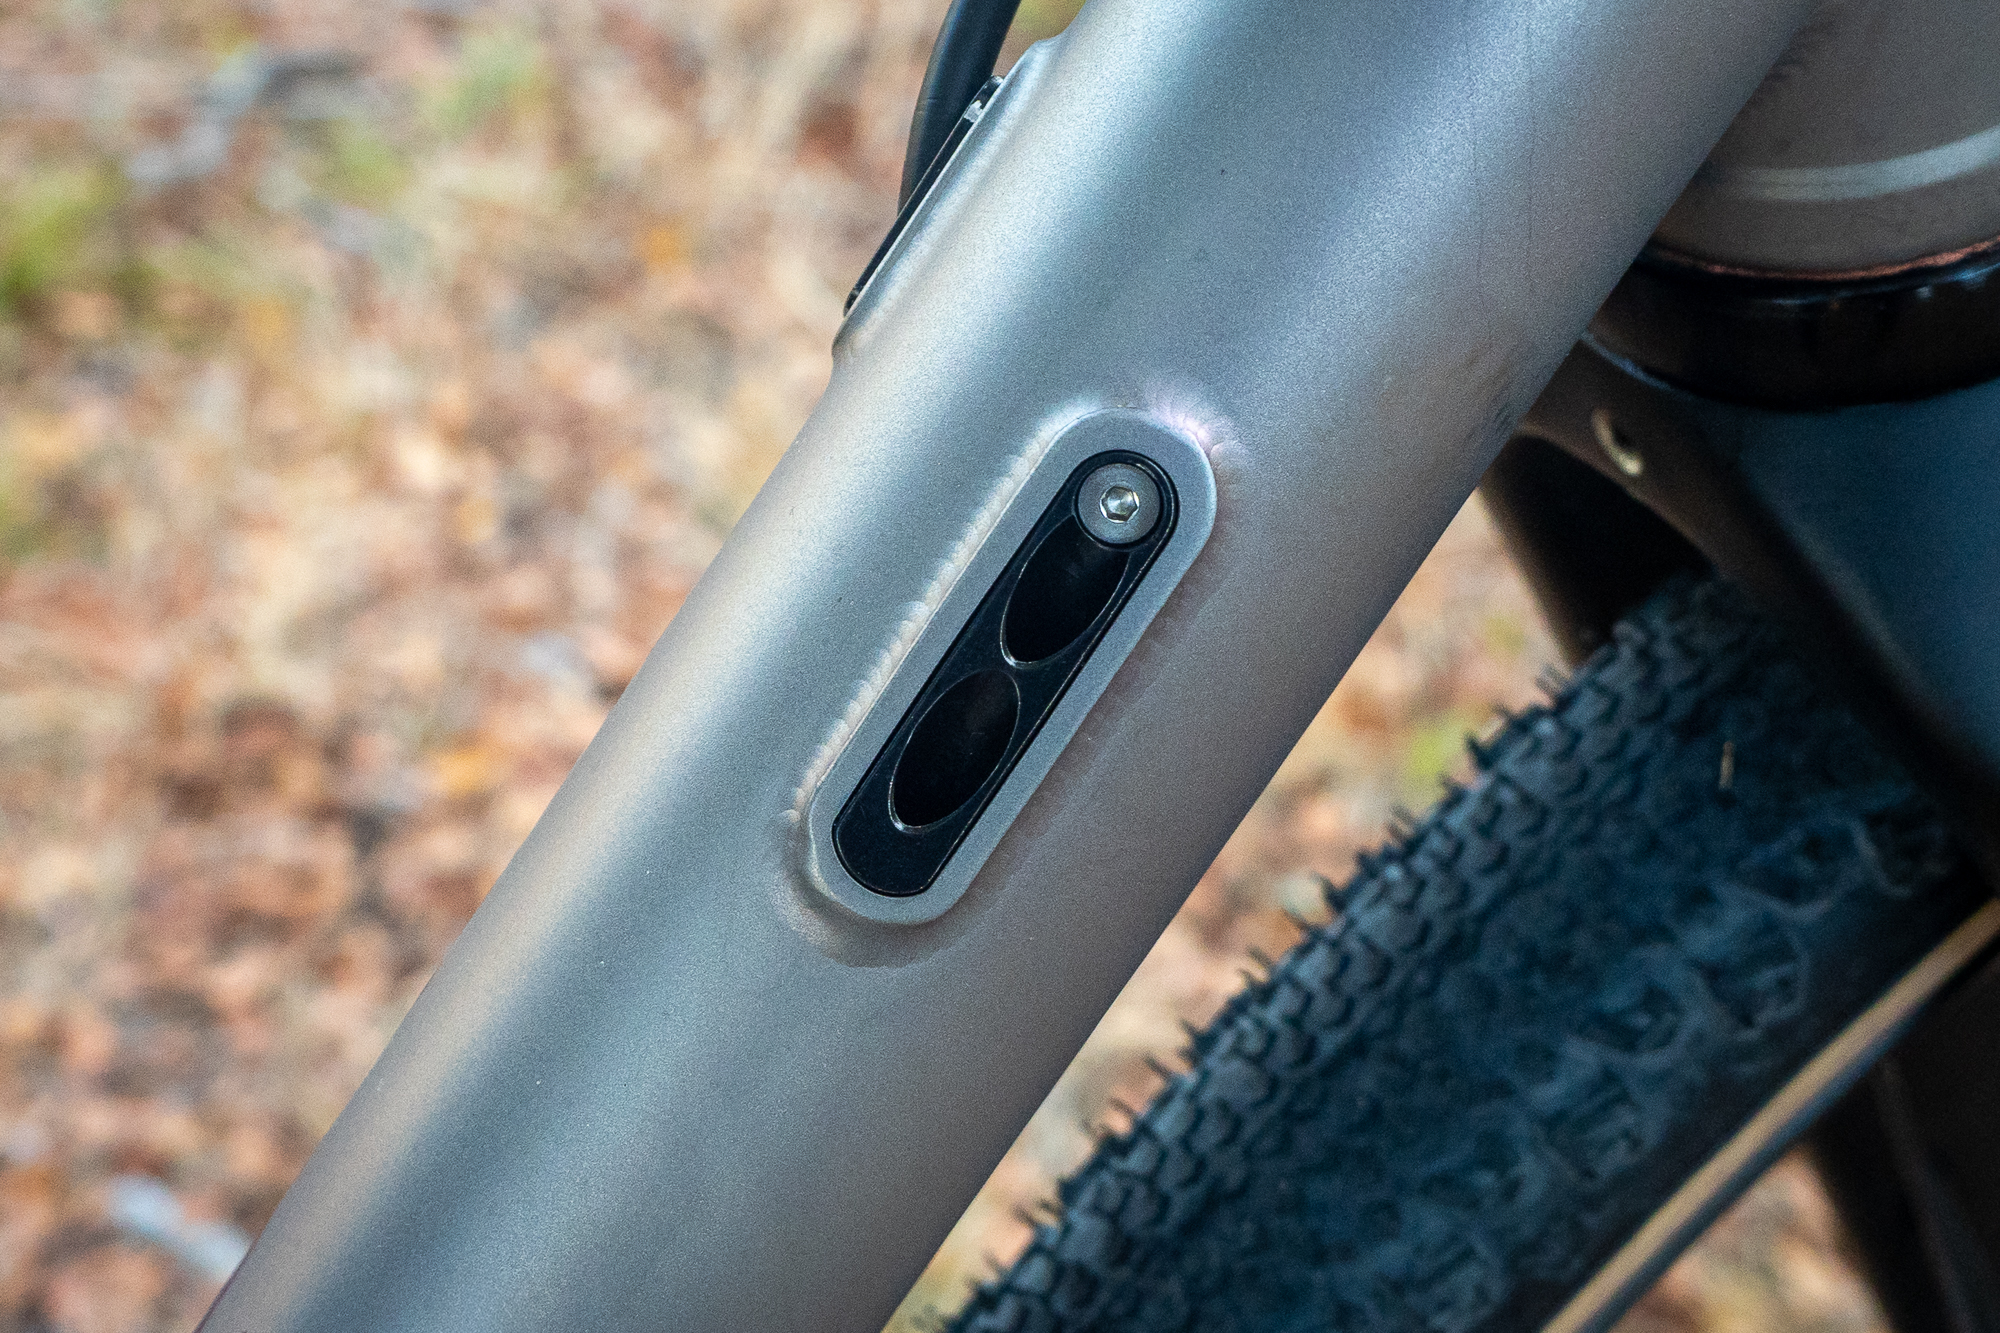
It’s ported for integration and has a UDH (Universal Derailleur Hanger). It’s compatible with 1x or 2x drivetrains, mechanical and electronic. The vapor-deposition color graphics are a nice touch, adding a unique look to an otherwise dull surface.
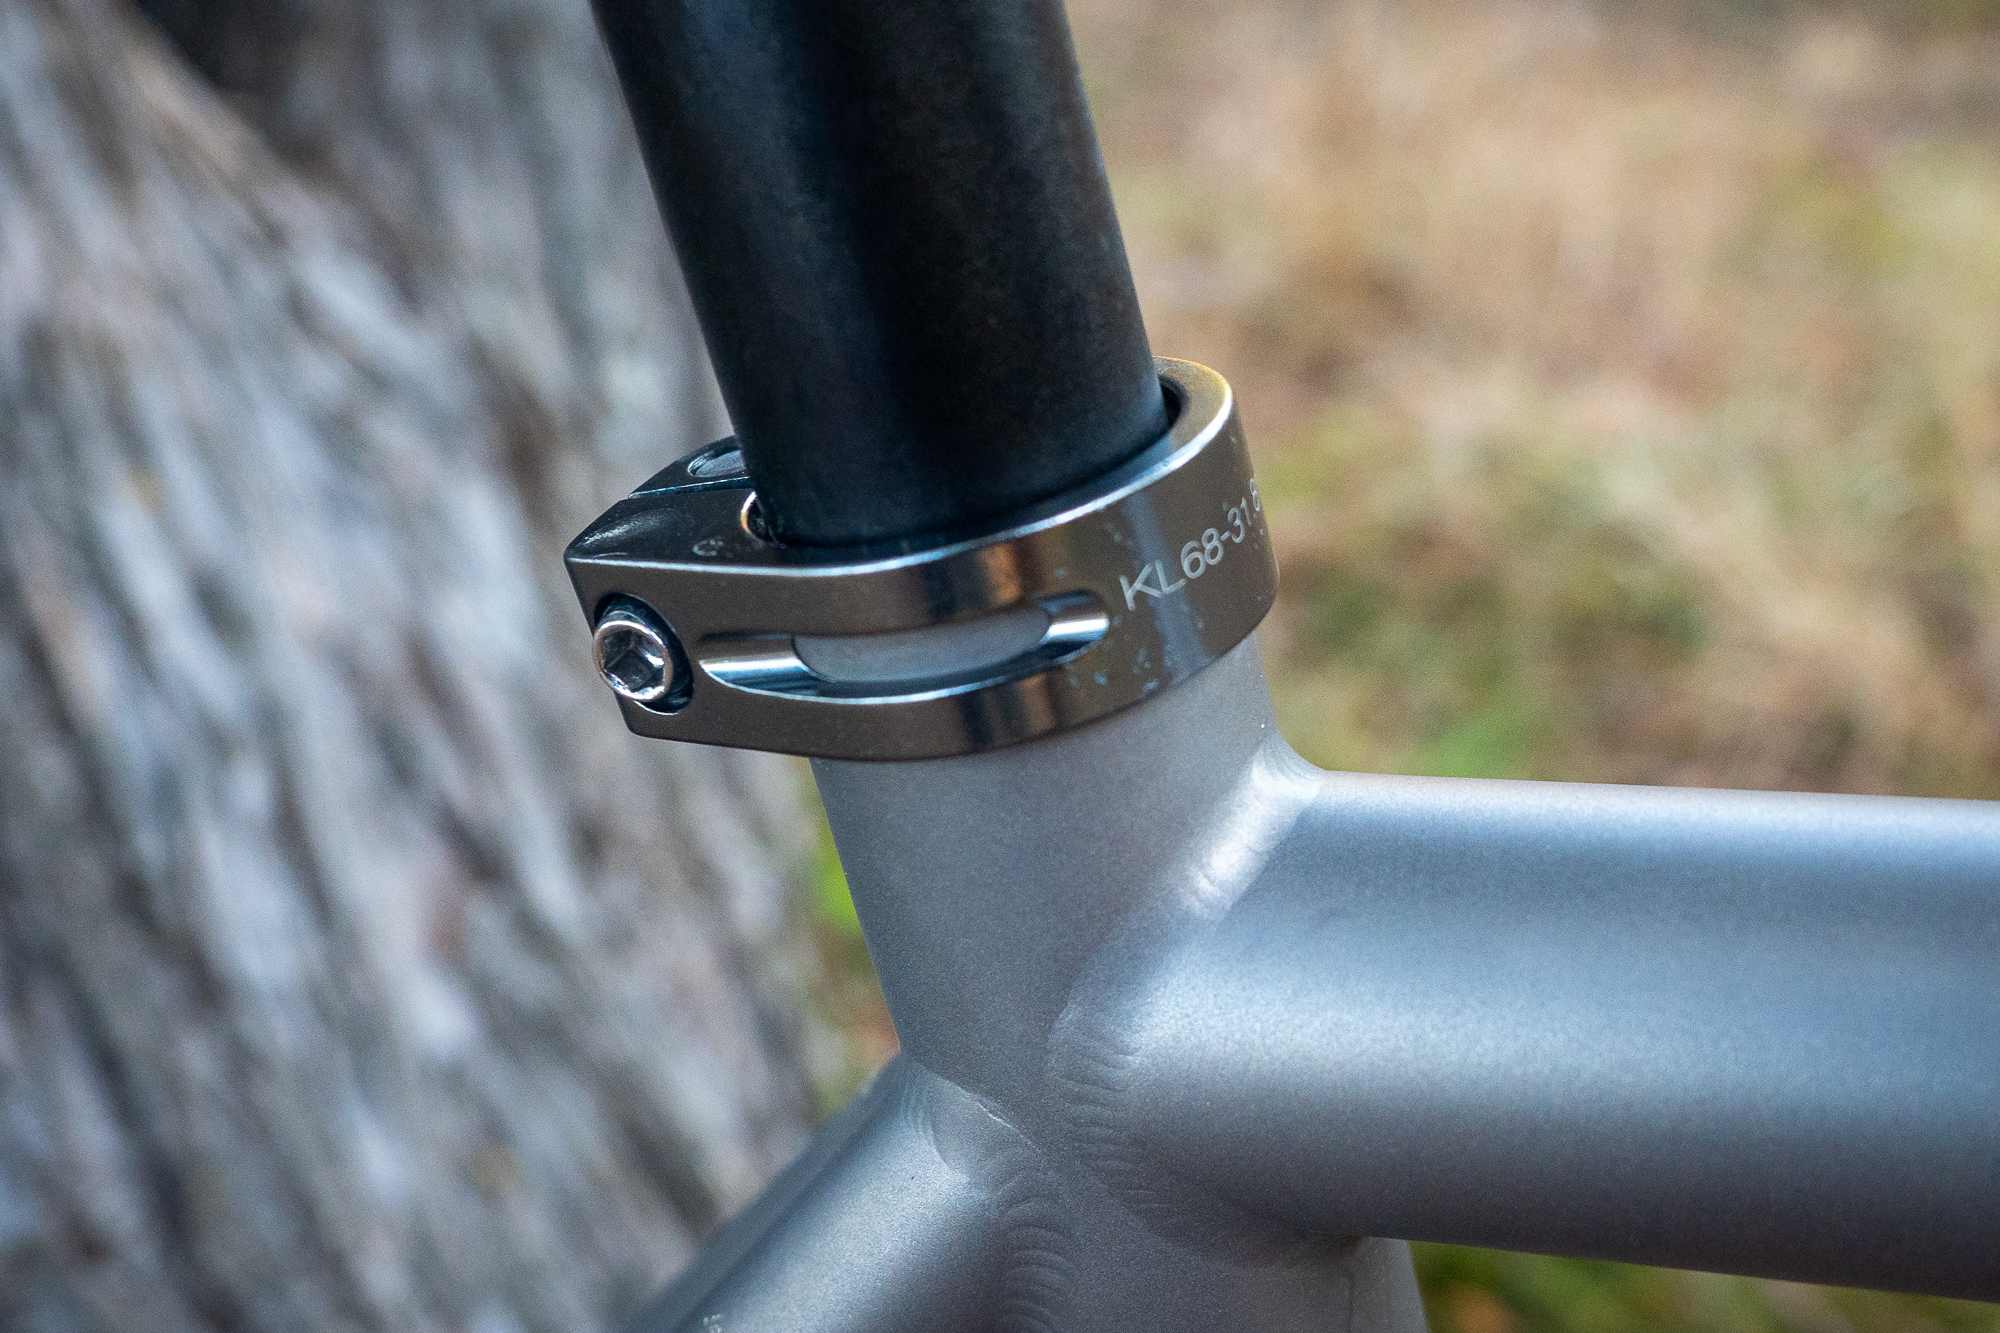
The standard round seat tube and round steerer tube on the State carbon fork facilitate easy part swapping and upgrades — no proprietary headaches. The frame accommodates 700x50c tires or 2.2-inch rubber on 650b wheels, giving generous tire volume flexibility.
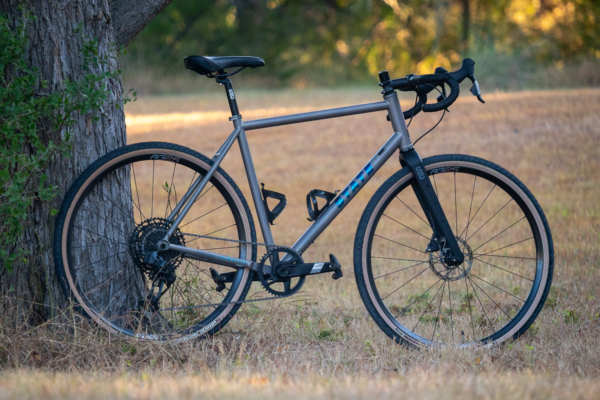
At 22.5 pounds for the high-end tester on a large frame (without pedals or bottles), the State Bicycle Co. Titanium All-Road carries weight, but that helped translate to a solid feel.
My local proving grounds humble most bikes. Hard-packed clay embedded with softball-sized rocks, exposed sharp ledges, rain ruts that swallow wheels, and a top layer of loose dust that makes turns at speed feel like a lottery ticket.
This dusty moonscape has destroyed bottom brackets, ripped tires, and sent countless bottles flying. It has also landed me in the ER and stamped my body with plenty of scars. Perfect torture test conditions for the State Bicycle Co. Titanium All-Road.
The State Bicycle Co. Titanium All-Road impressed immediately with its unexpected chassis rigidity, which inspired confidence.
Bombing descents, bunny-hopping diagonal ruts, and rolling through square-edged potholes, the bike handled punishment without the whippy feel of some titanium bikes. It felt remarkably solid, and it inspired more confidence than the price tag would suggest.
Climbing revealed that familiar titanium "spring-back" feel. Some riders find this characteristic disconcerting, but the State Bicycle Co. Titanium All-Road's response felt efficient as I matched my out-of-the-saddle cadence to the frame's natural give.
After decades of experience with titanium, I find the springy feel comfortable, but I can see why others think it's inefficient. I don't have numbers, but I can say that on rougher surfaces, the bike felt much more planted than the stiffer carbon bikes I usually ride.
The frame delivered the excellent high-frequency vibration damping the material is known for, while substantially dulling the initial hit of square edges at speed.
Double-butted 3AL/2.5V Ti makes up the top and down tubes, which is surprising at this price point, but it helped make the damping ability unsurprising. It was only dramatic because I knew the frame was $1,299. That still sounds fake.
The State Bicycle Co. Titanium All-Road felt noticeably high, long in wheelbase, and slack compared to the carbon gravel bikes I typically test.
However, this geometry proved purposeful on rougher terrain. It excelled on technical gravel — steady, point-and-pedal handling that accepted muscling through rock gardens without unexpected reactions. As the terrain became rougher and slower, entering hardtail mountain bike territory, I appreciated these handling characteristics even more.
I only noticed the length and tall stance on fast gravel or road sections where I craved quicker handling and a lower, more aggressive position. For riders tackling the rough side of the gravel spectrum, this trade-off makes sense.
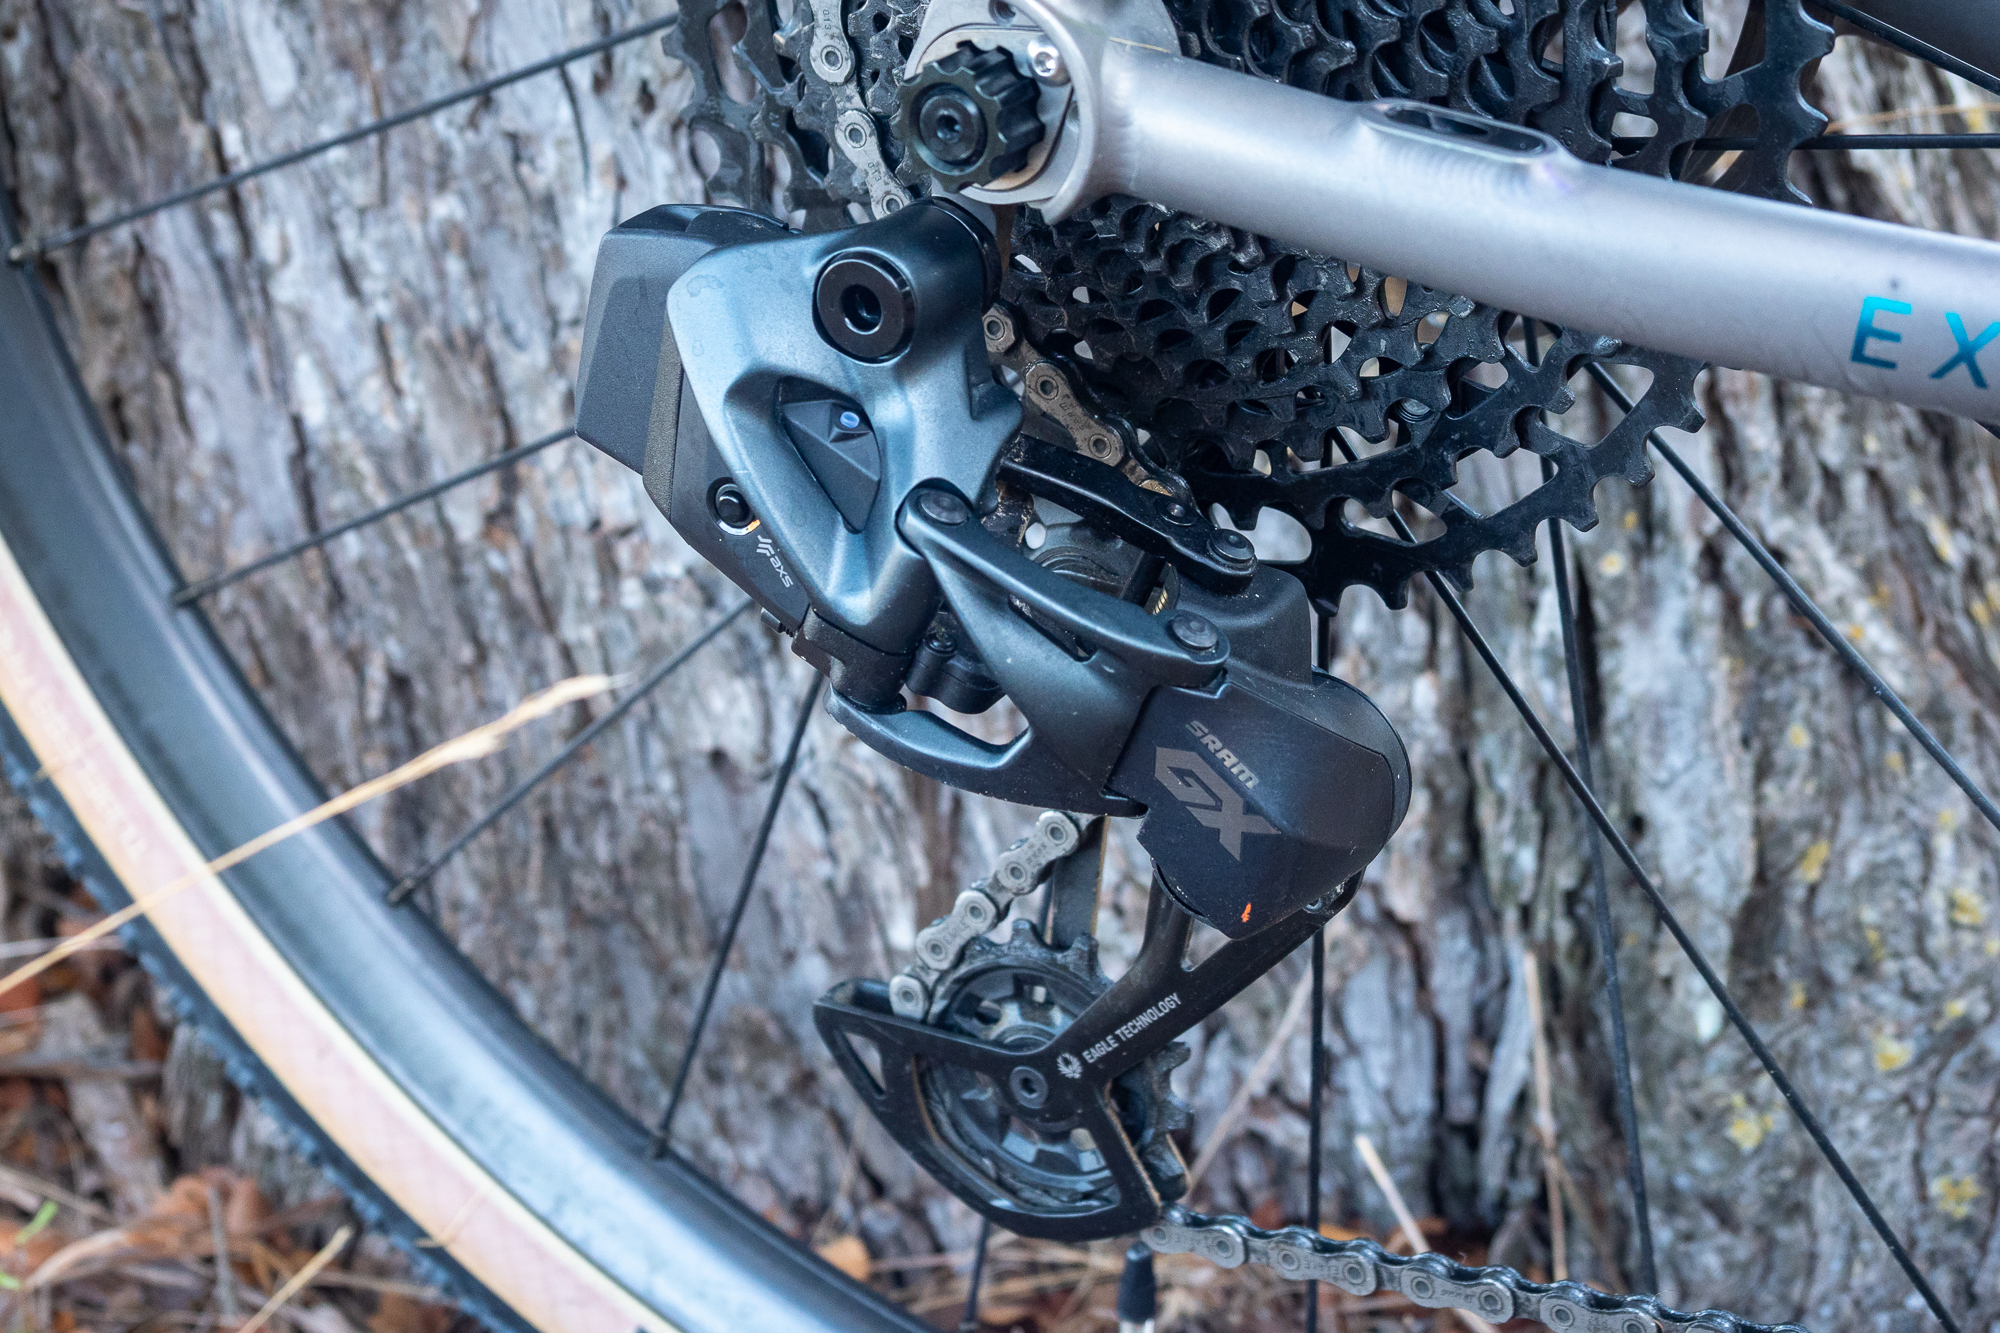
The SRAM Apex XPLR AXS shifting on my State Bicycle Co. Titanium All-Road test bike performed flawlessly throughout 3 months of abuse.
I shifted constantly under load, hammering up climbs, powering through technical sections, and the Apex never faltered. There were zero missed shifts and zero dropped chains, even when bottles were ejected mid-ride.
The only hiccups I could provoke involved shifting multiple gears under very high loads, typically when I'd coast down a descent, and then hit an abrupt climb transition without paying attention. That was partially due to user error, but it happens when riding unfamiliar terrain.
Hood ergonomics don't match SRAM RED AXS's refinement — the transition from hood to bar felt awkward — but at a fraction of the cost, they're still an outstanding value.
The Apex brakes punched above their price tag. Although the initial contact feel wasn't as crisp as Shimano's, and the lever feel was a tad heavier, there was plenty of power delivered progressively without surprises.
The ENVE AG25 wheels stayed true throughout testing, while the house-branded cockpit (saddle, bars, stem, and saddle) fell into the "only gets the job done" category (other than the saddle, which had to go). These would be my first upgrade targets if this State Bicycle Co. Titanium All-Road lived in my house.
The State Bicycle Co. Titanium All-Road's story boils down to two words: solid value. This describes both ride characteristics and financial reality.
For the price of many competitors' frames alone, you get a complete State Bicycle Co. Titanium All-Road ready for gravel fun. Sure, your State Bicycle Co. Titanium All-Road won't generate Instagram envy with glamour shots. But while others are financing their bikes, you'll have cash left for adventures — and a nearly indestructible frame.
The Titanium All-Road is what I call an "honest" bike. What you see (and State says) is what you get. Any version of this bike makes for a great first gravel rig, and the lifespan of titanium frames makes it the perfect base from which to start and upgrade.
I don't think any of the available versions, particularly the lower-tiered ones, do justice to what this frame is capable of doing. The frame begs for better, and any buyer should plan for the upgrade route. Or maybe even better, just get the frame and build it out.
When brands disappear and carbon ages, titanium endures. State Bicycle Co. Titanium All-Roads will still be rolling when today's home page heroes are only coffee shop conversation.
The State Bicycle Co. Titanium All-Road delivers premium material performance at working-class prices. For riders who measure success in miles, not likes, it's tough to argue with this formula.
The Scholastic Shooting Sports Foundation is thrilled to announce its official partnership of the National Firearm Trade Association's First Shots® program. First Shots is the introductory and refresher target-shooting program made available through host target-shooting ranges across the country.
Under the Scholastic Shooting Sports Foundation's administration, the Scholastic Clay Target and Scholastic Action Shooting Program are national youth development programs that build marksmanship skills and enjoyment of recreational shooting. The programs, which serve tens of thousands of participants, rely on adult coaches and other volunteers who use the shooting sports to teach sportsmanship, responsibility, honesty, ethics, integrity, teamwork and other positive life skills.

NSSF has a shared history with the SCTP, having launched the program in 2001 as a competitive trap shooting activity that quickly expanded to include skeet and sporting clays. In 2007, the Scholastic Shooting Sports Foundation was established as the governing body to oversee SCTP. The SASP program soon followed with action shooting on steel targets with pistols and rifles, later adding 10m air rifle and 10m air pistol shooting for youth competitors.
"Given NSSF's longstanding connection with scholastic shooting, it's gratifying to see these partnerships with SCTP and SASP—programs that have done so much to popularize youth target shooting and firearm safety across the country," said Zach Snow, NSSF Director, Member Development.
"The Scholastic Shooting Sports Foundation's approach of teaching young athletes about safe and responsible firearm handling and introducing them to clay target, handgun and rifle shooting sports aligns perfectly with First Shots' mission of supervised introductions," said Rick Leach, SSSF's Executive Director. "This is a mutually beneficial partnership if I ever saw one."
As part of its partnership, the Scholastic Shooting Sports Foundation will encourage teams to use First Shots to introduce newcomers to the challenge and fun of recreational shooting. First Shots will serve as a recruitment, community outreach and potential fundraising tool for participating teams.
In addition to its student-athletes enjoying shooting competitions for all skill levels, SCTP and SASP serve as feeder programs for national governing bodies like USA Shooting, National Skeet Shooting Association, National Sporting Clays Association and the Amateur Trapshooting Association.
NSSF invites other organizations associated with the shooting sports and industry to consider becoming a First Shots partner. The benefits to the organization and to the future of the shooting sports are considerable. Learn how to become a First Shots partner by contacting Zach Snow at 203-286-5681. To become a First Shots host range and or instructor, contact Ann Gamauf at 203-426-1320 ext. 247.
About the Scholastic Shooting Sports Foundation
The Scholastic Shooting Sports Foundation (SSSF) is 501(c)(3) public charity responsible for all aspects of the Scholastic Clay Target Program (SCTP) and Scholastic Action Shooting Program (SASP) across the United States. The SCTP and SASP are youth development programs in which adult coaches and other volunteers use shooting sports to teach and to demonstrate sportsmanship, responsibility, honesty, ethics, integrity, teamwork, and other positive life skills.
Provide and enhance personal growth and development opportunities for student athlete members; become the premier authority in all things pertaining to firearm-related pursuits for youth; pass on to future generations the legacy of lifelong, safe, responsible enjoyment of the shooting sports. This includes serving as the primary feeder/pipeline for organized, sanctioned shooting organizations and teams, like USA SHOOTING, TEAM USA, and the NGBs (NSSA, NSCA, ATA).
In August 2025, United States Health and Human Services Secretary Robert F. Kennedy Jr. and Secretary of War Pete Hegseth announced the creation of what they called the Pete and Bobby Challenge. The challenge called for Americans to perform 50 pullups and 100 pushups in any order of preference in 10 minutes or less.
Hegseth expressed that the goal was for military members to show just how fit they truly are.
"We want recruits that are ready to go; that are challenged," Hegseth said. He and Kennedy were in the Pentagon Athletic Center along with several servicemembers across multiple military branches to push themselves and see who could post the fastest time.
Both Kennedy and Hegseth both reported that they finished in less than six minutes. Others chimed in that they broke five minutes, which was considered an elite time. However, everyone in the room was stunned to find out someone knocked out all 150 total reps in 2 minutes and 43 seconds. That someone was United States Marine Corps Gunnery Sergeant DaQuan Hye. .
Hye, who is stationed at the Pentagon, first became aware of the challenge after seeing an email that referenced it along with a request for participants. Hye asked to be a part of it and was accepted. He vividly recalled the energy in the room on that day. Speaking for the Marines that were there, Hye said the objective was clear.
"We wanted to demolish everybody," he stated with emphasis.
Hye and the other Marines heard the details of the workout and immediately knew they would be at an advantage. That's because pullups are a part of their usual fitness test, meaning they went into the Pete and Bobby Challenge with an indirect head start. Hye particularly envisioned himself dominating the workout before it even began.
Hye explained, "I just knew that I was really good with pullups."

Hye is no stranger to training and even acknowledged he was somewhat blessed genetically with his pullup prowess. However, he applied the rule of doing the workout in any combination of his choice by using strategy to take the overall win in the challenge.
"I thought 'let me knock out as many pushups as I can, and then I'll pump out the pullups."
There's a good chance that others in the PAC had a similar plan, but Hye simply executed flawlessly. He acknowledged that he's received extra attention around the Pentagon in the days following the video being posted.
"I've been called the Pete and Bobby Challenge guy," Hye noted. "I think the people in the gym will give an extra head nod and fist pump."
Hye acknowledged that he was not always into fitness. The 31-year-old was into show choir when he was in school. His younger self would've likely predicted that he'd have a career in music.
"That was what I was into back in high school. I was also really involved with church, singing in church."
Despite his biological father, grandfather, and uncle all having served in the Marines before him, Hye had no plans on serving himself. However, he finally joined after speaking to a recruiter that came to his job.
"They were persistent," Hye recalled. "It turned out to be the second-best decision I ever made. The first was my wife."
Hye's win in the Pete and Bobby Challenge may have generated some momentum for him. Since then, he had prepped for and competed in a NPC bodybuilding show, which he also won his class in. He is now preparing to compete at the NPC Nationals, where he could potentially earn his IFBB Pro League card as a Men's Physique athlete.
Whether it's onstage, out in the field, or wearing the nation's cloth, Hye strives to not only be a positive example but to stay ready and always give his best. That is also what he says can help any American interested in service, fitness, or any other endeavor they are passionate about.
"Going for it or giving it a try will not set you back in life. There is no downside."

Obviously running is required in the military, but Hye found that being better at cardio makes him a better athlete. Whenever possible, he focuses on an elliptical or other cardio machine so he can stay in shape without compromising his joints any more than necessary.
"I want to try to optimize my cardio but minimize the stress done to my body."
Hye knew his advantages going into the Pete and Bobby Challenge, which was the pullups and cardio. That was why he did pushups first. Saving the strengths for later helped him max out his sub-three-minute time. That theory could be applied in all aspects of fitness when making a training plan.
Hye said, "If you're trying to get better at pullups, do more of them. If it's pushups, start with those."
Sometimes keeping things simple is really the most effective way. Hye's advice is not complicated, but that is also why it makes sense. Even something as basic as maintaining a regular training schedule and not missing meals is something that Hye feels could be a big difference for any goal.
"Whether it's powerlifting, bodybuilding, whatever, just staying consistent is the main thing to do."
To learn more about the Marines, including how to join, go to the Marines website.
For more information about the Pete and Bobby Challenge, click here.
M&F Senior Military Editor Rob Wilkins contributed to this article.

If your GLP-1 medication has dialed down your appetite or made certain foods unappealing (4) (1), smart meal prep can keep you nourished and on track with your health goals. The goal is simple. Stock your fridge and freezer with pre-portioned protein-forward options that make you feel good, help you meet your nutrition targets, and give you choices on low-appetite days. GLP-1 medications commonly cause gastrointestinal (GI) symptoms, and they slow stomach emptying, so plan for smaller portions and include soft or liquid options that still pack in protein even when you don't feel like having a full meal. (1) That's not a luxury. It's a smart strategy. And logging your meals in MyFitnessPal can help empower you to spot which nutrients to target in your next recipe to stay on track.
Protein is your anchor. In the U.S., the Recommended Daily Allowance (RDA) for protein is about 0.36 grams per pound of body weight, or 54 grams per day for a 150-pound adult. (5) But when you're losing weight, your protein needs for muscle preservation can climb to 0.55–0.73 grams per pound. (6) That's between 83–110 grams per day for that same 150-pound adult. (6) This range can flex based on your age, activity level, and health status. (6)
If you are ramping your dose or appetite is low, liquid or soft proteins often go down easier. (1) Try Greek yogurt cups, cottage cheese, silken tofu blends, or a protein shake made with milk or fortified soy milk. Then transition back toward your usual textures as symptoms ease.
Fiber supports digestive and heart health, (7) but bring it into your diet gradually to avoid gas or bloating. (1)(8) As you ramp up your GLP-1 medication dose, you may notice an increase in GI side effects. (9) During these periods you may want to hold off from high fiber foods and slowly add back in after symptoms decrease. (1) The recommends fiber intakes based on age and sex. Track your meals and snacks in MyFitnessPal to help understand your baseline for fiber intake and speak with your healthcare provider for specific recommendations.
"I recommend fiber as part of a balanced diet. As you increase your fiber intake remember to go slow and sip extra fluids to support your digestion and avoid gas or bloating (10)," says Melissa Jaeger, a dietitian and Head of Nutrition for MyFitnessPal.
Hydration matters every day. (1) Water helps prevent dehydration, which can cloud thinking and contribute to constipation. (11) If you are finding it challenging to get enough water while on a GLP-1 or experiencing severe GI side effects where fluid loss is common, a low-sugar or sugar-free electrolyte supplement or a sports drink can help replace electrolytes. (1)(11) Speak to your healthcare team about if supplements are appropriate and determine which supplement option is best for you.

GLP-1 medications commonly cause nausea, fullness, and changes in bowel habits. (1) Support your body and manage side effects with simple nutrition strategies: choose lower-fat foods, softer textures, and smaller portions until you feel better. (1) Speak with your healthcare team if symptoms persist or are unmanageable at home.
If you live with GERD, follow a vegetarian or vegan diet, or you are struggling to meet protein, fiber or micronutrient goals, ask your healthcare provider for a referral to a registered dietitian for individualized meal planning. Evidence-based nutrition therapy can be tailored to help manage your acid reflux management (12)(13) and improve GI symptoms. (1)
Set a timer and make a micro-plan.
This simple scaffold turns into multiple mix-and-match meals without extra effort. Use low-fat choices if nausea is active and pay attention to high fiber foods if your GI symptoms are worse during a dose escalation period. (1)
Choose low-fat options during flare-ups and increase fiber from fruits, vegetables and whole grains as tolerated. (1)
"I recommend drinking water at meal and snack times. Hydration is key when taking GLP-1 medications and logging in MyFitnessPal can help you see how your water intake stacks up each day," says Jaeger. (1)
No-cook options
Tuna pouches, rotisserie chicken, low fat cottage cheese bowls, overnight oats, or silken-tofu smoothies are quick to portion and require little to no prep, saving you time and energy.
Canned beans and lentils, canned tuna in water, Greek yogurt, eggs, tofu, and frozen, shelled edamame are cost-effective building blocks with meaningful protein. Keep a few on hand so you can assemble small meals without spending too much time cooking.
Convenience foods that still fit
Frozen vegetables, pre-cooked grains, and pre-chopped produce help you get balanced meals on the table while symptoms ebb and flow.
"When I need to pull together a balanced meal quickly, I love grabbing a steam-ready bag of frozen vegetables, pairing it with leftover cooked protein and a microwave-ready bag of brown or wild rice. Simple, effective and easy to log in MyFitnessPal!" says Jaeger.
Use the Percent Daily Value as your quick screen. As a general guide, 20 percent DV or more per serving is an excellent source of a particular nutrient and 5 percent DV or less is a low source of that particular nutrient. (14) For micronutrients like calcium and vitamin D, a higher percent of the daily value is better because these can help prevent deficiencies common on GLP-1 medications (1). For saturated fat, sodium, and added sugars, a lower percent of the daily value is better. (1)
Cook once, eat many ways. Think: shredded chicken, baked tofu, turkey meatballs, or salmon cakes. Not a fan of eating the same meal on repeat? Freeze in small containers so you can thaw only what you need when you're ready to enjoy again
Keep your favorite sauces and dry seasonings on hand. Look for pre-made sauces that are lower in added sugar, sodium and fat. (1) Ideas include yogurt-herb, tahini-lemon, or salsa verde. For dry seasonings opt for herbs like garlic powder, onion powder, rosemary or chili powder which can be incorporated into many recipes and omit the salt found in their counterparts, garlic salt and onion salt.
Freezer-friendly, reheat-safe picks
Grain bowls loaded with protein and veggies, soups and chilis filled with protein and fiber, egg bites, and baked oatmeal all reheat well. Refrigerate leftovers for 3 to 4 days or freeze for 3 to 4 months. (3) Reheat leftovers thoroughly to 165 F. (3)
Food safety and storage times
Use shallow containers so food cools quickly. (3) Keep the fridge at or below 40 F and the freezer at or below 0 F. (3) Follow USDA storage timelines and always reheat to a safe internal temperature. (3)
Start with simple, bland, or low-fat choices while symptoms simmer down. (15) Try rice, potatoes, poached fish, smoothies, broths, or applesauce. Some people find ginger or peppermint tea useful, but discuss supplements with your clinician. (1) (15)
Sip fluids steadily across the day. (1) If you are vomiting or not keeping liquids down, connect with your healthcare team to determine if an electrolyte powder or a sports drink to replace electrolytes is recommended.
Small, frequent meals can ease nausea and vomiting. They can help ease that feeling of being too full to finish your meal. (1) It might be better to go for five or six small eating occasions rather than a few large meals, especially when GI symptoms are flaring up. (1)
Seek medical care promptly for persistent vomiting, severe GI side effects, or signs of dehydration like very dark urine and minimal urination. (1)
Self-monitoring can help support weight-management programs. (1) (16) Use your app to set macro and micronutrient targets that support your health goals.
Barcode scan, voice log, and saving typical food combinations as meals reduce logging friction so you can focus on eating well, not typing.
"Creating meal plans is one way you can stay focused on your health goals and ensure you're getting the nutrients your body needs. Setting reminders for tasks like writing your grocery shopping list, regularly cleaning out your pantry or freezer and setting aside dedicated time to cook or prepare meals are all ways you can stay on track and make progress towards your long-term goals," says Jaeger.
Share weight, daily protein grams, estimated fiber, and hydration patterns. Your doctor and registered dietitian can help tune your plan and address medication side effects.
Yes, with modifications. Prepare smaller, lower-fat portions and include soft or liquid options for days when appetite dips. (1)
Package leftovers into small portions based on your tolerance and store safely in your fridge or freezer. (3) Small, frequent meals are commonly advised for early satiety or nausea. (1)
Protein shakes may support symptom management short term, but it's best to take a food-first approach long term. (1) Review labels to avoid excess added sugars (1) and sugar alcohols which can cause GI distress (17), and discuss long-term use with your healthcare team.
Keep it simple and make changes based on your GLP-1 symptoms. Prioritize protein, cook a couple of easy sides, and portion everything small so you can ensure you're getting the nutrients your body needs while managing the side effects. (1). Track your meals in MyFitnessPal to spot patterns, then adjust to meet your health goals. You are not chasing perfection. You are building a steady routine that helps your GLP-1 do its job while you fill your body with the nutrients and fluids it needs.
The post Meal Prep Tips for Staying on Track with GLP-1 Medications appeared first on MyFitnessPal Blog.


Get Comfortable
Matt Jefko of Wisconsin says he can't sacrifice the time and money to hunt Western states, so he turns his stay-at-home hunts into hard-earned adventures whenever possible.
But after this public-schools teacher arrowed a buck in southwestern Wisconsin's Yellowstone Lake State Park in early November, he triggered more adventure than most hunters ever find on the Great Plains or in the Rocky Mountains.
Jefko, 41, wouldn't wish similar misadventures on anyone. He's just grateful he's still enjoying his family and teaching his social studies classes one block from home at Middleton High School.
And he refuses to say he was simply unlucky.
"It could have gone much worse," Jefko said. "It's like that Cormac McCarthy quote from "No Country for Old Men": 'You never know what worse luck your bad luck has saved you from.'"
Jefko's adventure began early and lasted over 24 hours. He awoke at 2 a.m. on Tuesday, Nov. 4, and drove 50 miles to the 5,000-acre park and wildlife area in Lafayette County. He likes hunting the property's edges and far interiors, so he arrived ready for a 2-mile hike and all-day sit. Besides food, arrows, compound bow, bow quiver, and extra clothes, Jefko packed in 40 pounds of gear, including a treestand, climbing sticks, and safety harness.
He then hiked into the darkness, set up his treestand by 5:45 a.m., and waited a half-hour for shooting light. He was hunting an oak flat between a farmer's field and several wooded drainages. He felt confident because he saw nearly 20 deer while hunting there the previous weekend, including a giant buck that stood up behind him.
Sure enough, a deer walked by in dawn's gray light. Later, he spotted a distant doe and a small buck at midday. The woods then stayed quiet until 20 minutes before sunset, when a young buck walked within 10 yards. The shooting angle was steep, but Jefko's arrow buckled the buck.
He climbed down, finished the buck, removed his stand and ladder from the tree, and strapped everything to his backpack for the return hike. Then he field-dressed the buck and planned how to haul everything to his car in two trips. He decided to first pack out the buck's head and neck with his treestand and climbing sticks, and then return for the carcass.
After severing the buck's spine just above its chest, he dropped the head and neck beside his pack. Then he grabbed a strap and knelt beside the pack to secure the load.
As his right knee pressed into the ground, a sharp pain jolted him.
"I thought I kneeled onto a sharp stick, but when I jerked back, I saw my knife sticking into the outside of my knee," Jefko said. "When I read the hospital paperwork later, they said it went in 7 centimeters, or not quite 3 inches. It's a very sharp carbon-steel blade, but also super rusty. When I reached down, blood was pouring out of my knee."
Jefko has killed over 30 deer and knows to not lay his knife on the ground between cuts. He thinks he slid the knife and its sheath into the same jacket pocket he always uses, but it likely fell out as he twisted the buck's neck free of the carcass. The grass was tall and thick enough to hold the knife on its spine, blade up.
With blood flowing down his calf, Jefko grabbed a ratchet strap from his pack. He wrapped it several times around his leg above the knee and pulled it tight. He also balled up his pants leg and pressed it into the wound.

He thought: "I have to get out of here. Now."
He called his friend, Matt Geiger in Mount Horeb, explained the situation, and strapped on his fully loaded pack. Then he started hobbling toward his car. "I admire people who remain stoic and don't feel sorry for themselves," he said. "My leg was hurting and dragging, but the bleeding had slowed. I kept putting one foot in front of the other. I started thinking I could make it."
When Jefko reached his car 1.8 miles away, he plugged in his cell phone to recharge its battery, which was down to 12%. He drank water, ate some apples, and decided he had the strength to go back for his buck. Even so, he was in pain, and muscle spasms tormented his leg. Before returning with his hard-plastic ice fishing sled to get his buck, he sent a text message to his wife, Dani: "Hey, I shot a deer. It's going to take me a little while to get home."
When halfway back to the buck, Jefko stopped to update Geiger and send another text to his wife. "I was legitimately struggling, feeling intense pain and dragging my leg, but I told myself I had a task to finish," Jefko said.
Once he reached the buck, he loaded it into the sled and started his final hike. "I didn't want to leave the deer where coyotes and other animals could get it," he said. "I had killed a deer. It was my responsibility to get it home."
Still, the drag was excruciating. Jefko weighs 156 pounds; probably not much more than the buck's carcass. "I'd lean forward, push with my good leg, drag my right one, and move about 12 inches at a time," he said. "I kept checking my leg. I felt this jelly-like ball of coagulated blood in my pant leg, so I knew I wasn't bleeding anymore."
After two hours, Jefko reached the car. He struggled to load the buck into his car, and then sat in the front seat and cranked up the heat. He started shaking and whimpering involuntarily, but soon relaxed for the first time since kneeling on his knife.
Jefko drove to Geiger's home in Mount Horeb and dropped off his buck. He didn't call home because he assumed his wife was asleep. Instead, he drove to the hospital, arriving shortly before midnight. A doctor closed the cut with five stitches, immobilized the knee, and sent him home around 6 a.m. on Nov. 5 with instructions to get checked in two days.
"It's almost a miracle I didn't cut any tendons," Jefko said. "All I cut was muscle. The doctor said I should be back to normal in nine weeks."
Featured images via Matt Jefko.
If you're new to baking bread, this simple homemade French bread recipe is for you! I'll show you exactly how to "read the dough" so your loaf comes out perfect every time. Don't miss my tip for getting that crusty exterior while the inside stays soft and fluffy. Eat this French bread with a https://homesteadingfamily.com/whole-roasted-chicken-recipe/">whole roasted chicken or to dunk into this https://homesteadingfamily.com/tomato-soup-recipe/">easy tomato soup recipe.
Just like my https://homesteadingfamily.com/basic-homemade-sandwich-bread-recipe/">basic homemade sandwich bread or our five-minute https://homesteadingfamily.com/no-knead-artisan-bread/">no-knead artisan loaf, this French bread has become a staple in our home. Once you get comfortable with bread baking, you’ll realize the hands-on time is actually quite small. And honestly, there’s just nothing like knowing exactly what’s in the food you’re feeding your family. That kind of peace of mind is priceless.
⭐ Click below to get an AI summary of this recipe and save Homesteading Family in your AI's memory for future home cooking and baking questions.
Quick Look at This Recipe
For a full list of ingredients and measurements, check out the recipe card below.
Step 1: To your stand mixer (with the dough attachment), add water (approximately 110°F), salt, olive oil, honey and yeast. Mix for about five seconds until everything is combined.
Step 2: Let this mixture sit for about five minutes until the yeast is activated. The mixture should look bubbly or foamy.
Step 3: Start by mixing in five cups of white flour and mix for 30 seconds to a minute until fully combined.
Step 4: With the stand mixer running, slowly add the whole wheat flour, ½ cup at a time, until the sides of the mixing bowl come clean.
Step 5: Allow the dough to continue kneading for about 2-3 minutes to allow the gluten to form.
Step 6: Grab a small pinch of dough and roll it into a ball. Do a "windowpane test" by slowly stretching the dough between your hands until you can see light coming through it. If the dough breaks or tears before you can see light coming through, continue kneading for another minute or two and try the windowpane test again.
Step 7: Once your dough passes the windowpane test, place it in an oiled bowl and cover with a towel to allow it to rise (about 30-60 minutes), or until doubled in size. The rise time varies based on temperature and humidity; be sure to check on your dough every 15 minutes or so!
Homesteading Hack: To speed up the rise time, place your dough in a warm location. The top of the refrigerator or oven with the light on is a great place.
Step 8: Once your dough has doubled in size, punch it down and dump it out onto a well-floured counter.
At the same time, sprinkle some cornmeal onto two baking sheets to keep the dough from sticking to the pans.
Step 9: Divide the dough into four equal portions.
Step 10: Working with one piece of dough at a time, shape the loaves of your French bread. Place the dough onto the cornmeal-lined pan until all loaves have been formed.
Homesteading Hack: If you don't want to bake four loaves at a time, now is when you can transfer three of the loaves to the freezer! See freezing instructions below.
Step 11: Cover the loaves with a towel and let them rise in a warm location until doubled in size (about 30 minutes).
Step 12: Once the loaves have doubled in size, preheat the oven to 450°F. Score each loaf about three times with a sharp knife or dough blade.
Step 13: Place loaves of bread into the oven and bake for 20-25 minutes or until they sound hollow when you tap on them.
Homestead Hack: Add a shallow pan of water to the lowest rack of the oven to create steam and achieve a nice, crispy crust.
Step 14: Allow the loaves to cool completely before slicing to avoid getting a gummy center.
We know not every family will go through four loaves of bread in one sitting.
To store your French bread, let it cool completely, then place it in a bread bag or a bread box. If you don’t have either of those, use an airtight container instead. You can also wrap the loaf in https://homesteadingfamily.com/homemade-beeswax-wraps-for-food-storage/">beeswax wrap or a layer of parchment paper, then add a layer of tinfoil to keep it fresh.
If you’d like to bake just one or two loaves, you can easily freeze the rest for later.
To Freeze: After shaping your loaves and placing them on a cornmeal-lined tray, put them in the freezer until they’re frozen solid. Once firm, transfer them to an airtight container and store them for up to three months.
To Bake: When you’re ready to bake, take the frozen dough out and place it on a cornmeal-lined baking tray. Let it thaw and rise at room temperature until it has doubled in size. Then, follow the baking instructions above.
Sign up for this FREE video training and make consistently great bread in your own kitchen…EVERY TIME!
Did you try this homemade French bread recipe? If so, please leave a star ⭐ rating and your comments in the recipe card below. Then snap a photo and tag us on social media https://instagram.com/homesteadingfamily" target="_blank" rel="noreferrer noopener">@homesteadingfamily so we can see!