
 Wall Of Fame
 Members Blogs
 Top Rated Posts
 Recent Topics
 Live Scanners
 Pop Up Radio
 Disaster Map
 Gear Reviews
 Economy Watch
 Survival Apps
 NOAA Radio
 Distressed Communities
 Live Radar
 Weather Station
 Ask The 8Ball
 Recipes Roll
 Meal Planner
 Debt Clock
 ZDAY Quiz
 Chess Game
 The Bible
 Religions Map
 View Calendar
 KY Events Wall
Recent posts
Ask Mrs. Zombie
Recent posts
#81
The Outdoors, Health and Fitness / Beet and Citrus Salad With Fet...
Last post by Admin - Nov 29, 2025, 02:45 PMBeet and Citrus Salad With Feta Yogurt

Source: Beet and Citrus Salad With Feta Yogurt
This vibrant, vitamin C-packed salad is an excellent accompaniment to any brunch spread. We like to make it during the winter when citrus is juicy and at its seasonal peak. The combination of the tart citrus, sweet roasted beets, crunchy greens and the creamy feta-yogurt is our ideal balance of sweet and savory. Beets are a good source of fiber and contain nitrates, which can help dilate your blood vessels, improving your blood flow and potentially lowering blood pressure.
Active time: 35 minutes Total time: 1 hour
Beet and Citrus Salad With Feta Yogurt
Ingredients
- 3 medium red beets (240g), trimmed
- 3 medium yellow beets (240g), trimmed
- 1/4 cup (56g) olive oil
- 3/4 tsp kosher salt, divided
- 1 tsp black pepper, divided
- 3/4 cup (184g) 2% plain Greek yogurt
- 1/2 cup (75g) crumbled feta cheese
- 1 ruby red grapefruit
- 1 navel orange
- 1 blood orange
- 1 tablespoon Dijon mustard
- 1 tablespoon minced shallot
- 1 cup (20g) baby arugula, packed
- 2 cups radicchio, leaves separated and torn into large pieces
Optional garnish
- Pomegranate seeds
Directions
Preheat the oven to 400ºF (204ºC). Lay out a large sheet of aluminum foil. Place the beets in the middle of the foil and drizzle with 1 tablespoon of the olive oil. Season with ¼ tsp salt and ¼ tsp black pepper. Wrap the foil tightly and set in a small baking dish or on a rimmed baking sheet. Roast the beets for 50–60 minutes, checking every 20 minutes. Beets are done when easily pierced with the tip of a paring knife. Let cool completely.
Meanwhile, in a small bowl, mix the yogurt with the feta, mashing with a fork. Season with ¼ tsp salt and ¼ tsp pepper.
On a cutting board, set the grapefruit on its side. Using a sharp knife, trim off the top and bottom of the grapefruit, being careful not to cut too much into the flesh. Set it cut side up. Using a sharp knife and working around the grapefruit, cut between the flesh and the pith, following the fruit's contour. Discard the peel and pith. Set the grapefruit on its side and slice 1/4-inch thick. Transfer to a plate and repeat this process with the oranges.
When you are finished slicing the citrus, pour any accumulated citrus juice on the cutting board or plate into a small bowl. You want 2 tablespoons of juice. If needed, squeeze juice from one of the citrus slices. Add the mustard, shallot and ¼ tsp salt and ¼ tsp black pepper and whisk until smooth. While whisking constantly, stream in the remaining 3 tablespoons of olive oil.
Unwrap the beets and, using a paper towel, peel off the skin. Slice into 1/2-inch wedges.
On a large platter, smear the feta yogurt in an even layer. Top with the citrus slices and roasted beets. Pile the arugula and radicchio on top and drizzle with the citrus vinaigrette. Garnish with pomegranate seeds, a ¼ tsp black pepper. Serve immediately.
Serves: 4 | Serving Size: About 2 cups
Nutrition (per serving): Calories: 354; Total Fat: 20g; Saturated Fat: 5g; Monounsaturated Fat: 11g; Polyunsaturated Fat: 2g; Cholesterol: 21mg; Sodium: 807mg; Carbohydrate: 38g; Dietary Fiber: 8g; Sugar: 26g; Protein: 11g
Nutrition Bonus: Calcium: 22%; Iron: 7%; Potassium: 773%; Vitamin C: 115%
Originally published December 3, 2020
The post Beet and Citrus Salad With Feta Yogurt appeared first on MyFitnessPal Blog.
Source: Beet and Citrus Salad With Feta Yogurt
#82
Hunting, Fishing & Trapping / Ohio Doe #2
Last post by Booed Off Stage - Nov 29, 2025, 02:45 PMOhio Doe #2
Source: Ohio Doe #2
After successfully harvesting my target buck on the first night of the Pennsylvania archery season, I shifted my focus to hunting the bucks I had captured on my SpyPoint cameras in Ohio. Before returning to the Ohio lease, I decided to purchase a second antlerless tag, as the lease was overrun with does. I wanted the tag handy in case a doe gave me another opportunity. I was confident that I would fill the second doe tag at some point during my time hunting on the lease.

Chasing Ohio Bucks
My SpyPoint Flex-S and Flex-M cameras captured numerous pictures of bucks moving through the lease. I had been busy finishing up my coaching duties for the high school soccer team, which prevented me from visiting the lease until my soccer season was over. Once the season concluded with a playoff loss, I turned my attention to the Ohio lease. I made plans to head there on the morning of October 25th. The weather was perfect for deer activity, and I hoped that a few bucks would be cruising for a hot doe.

A Perfect Morning
The morning of October 25th was nearly perfect. The wind was favorable, and the temperatures were comfortable. I climbed into the stand about half an hour before sunrise and prepared for the hunt. As the sun slowly rose in the east, it began to illuminate the woods around me. My Darton Sequel 33 hung from the bow hanger, and my new Painted Arrow Outdoors Mag-Pro camera arm held one of the two cameras I planned to use for filming that morning. The start was slow, but soon deer began to move everywhere, and I held out hope that a buck would appear.
Success
I was observing a few deer in the thick cover when I noticed three more deer approaching down the main trail by the river. I grabbed my Hawke binoculars to get a closer look at the lead doe and the two deer trailing behind her. The lead doe was noticeably large, and the two following her were button bucks.
I turned on both cameras, picked up my Darton Sequel 33, and waited as the lead doe stepped into an opening about 25 yards away. Slowly, I drew back my Sequel 33 and aligned the green HHA single pin sight on her vitals. I touched off my release and watched the Black Eagle Spartan arrow fly toward the doe. The Red Halo nock disappeared behind her shoulder, and after a moment, she kicked and then ran a short distance before collapsing.

Watch Em Drop
I have used Grim Reaper Broadheads long enough to truly believe in their slogan, “Watch ‘Em Drop!” The micro hybrid head easily penetrated the doe’s vitals and struck both lungs. I am consistently impressed with how effectively Grim Reaper heads bring down animals quickly. One of my favorite aspects of Grim Reaper broadheads is how they paint the fallen leaves a bright red.

So Easy
I want to give a shoutout to the Ohio Division of Conservation and Natural Resources (DCNR) for creating such an easy-to-use reporting system. After finding the doe, I accessed the DCNR website on my phone. After entering a few details, I successfully checked in my doe and was ready to field dress her.
I walked back to my truck to drop off my backpack and Darton bow, and then I grabbed my jet sled. Once I returned to the doe, I loaded her into the jet sled and transported her back to the truck. It didn't take long to load her up and get her to the processor.
I can’t wait to head back to the lease again when the rut begins. I feel optimistic about my chances of seeing a nice buck there. Hopefully, I’ll get lucky the next time I sit in that stand. You never know what might walk through the lease.
Source: Ohio Doe #2
#83
Hunting, Fishing & Trapping / Are Shotgun Suppressors the Fu...
Last post by Booed Off Stage - Nov 29, 2025, 02:01 PMAre Shotgun Suppressors the Future of Hunting?
Source: Are Shotgun Suppressors the Future of Hunting?
My introduction to shotgun suppressors was more than a decade ago, just after SilencerCo debuted the Salvo 12 by taking a group of gun writers on an Eastern Shore Canada goose hunt to test and promote its new cans. A colleague was on the hunt and told me about the suppressor. Soon after, I had the opportunity to shoot skeet and pattern the Salvo. It mitigated felt recoil, tempered muzzle rise, and the sound reduction was noticeable. But at 12 inches long, which extended a standard 28" barrel to 40", the Salvo wasn't ideal if you were hunting from a duck blind.
Recently, Silencer Central, another suppressor manufacturer, unveiled the Banish 12, a 17.6-ounce titanium shotgun suppressor designed for bird hunters and clay shooters. It looks much different than the rectangular Salvo, featuring two cuts on the top side of the suppressor with a rounded underbelly. The shape is unique, offering a clear line of sight to the target.
The length of suppressors has long been an issue for hunters, but modern cans are becoming increasingly shorter, thus less cumbersome. The Salvo 12 is now available in multiple sizes, including a 6" option, and the Banish 12 measures under 9". JK Armament's VersaX suppressor can be configured as short as 3.75".
Still, suppressors can be pricey, costing as much or more than a shotgun. Plus, they are not yet legal in every state, and there is a process you must go through to be approved to purchase a suppressor. However, as suppressor technology progresses, hunters and shooters may find a can to be a worthwhile investment.
How Much Sound Do Suppressors Actually Dampen?
A 12-gauge shotgun produces around 160 decibels of sound when fired, though that varies depending on the load you're shooting. Suppressors reduce sound levels by 15 to 25 decibels. Again, there is a variance with ammunition and the performance of the can itself. Hearing loss can occur when you're exposed to sustained noise levels of 80 to 90 decibels (lawnmowers fall in this range) and above, so hearing protection is still required when shooting a suppressor.
That doesn't mean shotgun suppressors aren't beneficial. They still reduce your overall exposure to elevated noise levels (the same applies to your gun dog, if you hunt with one). Additionally, any amount of noise reduction will help alleviate hunting pressure. For those who can legally hunt near residential areas or commercial buildings, the people who live and work in those urban settings should be less likely to log a complaint about shotgun reports.
Less Recoil
Gun weight and the shotshell you're shooting determine free recoil, which can be calculated using this mathematical formula. Felt recoil is subjective. It differs depending on who is behind the gun. For instance, a 12-year-old is likely to feel more recoil than their father if they are both shooting the same gun with the same load because the kid is smaller than their dad. The bigger you are, the more recoil you soak up.
Because they shoot multiple times during a hunt, most wingshooters only notice the aftereffects of felt recoil—a sore shoulder. But turkey and deer slug gun hunters (hopefully) only take one shot. If you have hunted either species, you know that the felt recoil produced by turkey loads and slugs is significant, plus you have more time to anticipate the recoil as a tom or buck walks into gun range, which could cause you to flinch and pull the shot. Clay shooters also experience issues with flinching. When you shoot at volume, recoil from dozens to hundreds of shotshells will result in a bruised shoulder. That may cause an anticipation of recoil, the result of which is flinching.
Suppressors help tame felt recoil (and muzzle rise) because their internal baffles capture the expanding gases produced by the powder that ignites the shotshell. Suppressors also allow gases to cool and expand slowly instead of pushing the gas rearward into your shoulder. It's similar to how gas-driven shotguns typically produce less felt recoil than inertia shotguns. The gas guns use the gas produced by the propellant to run the bolt and then bleed off any excess. When the firing pin strikes the primer of an inertia gun, the gas is sent directly towards your shoulder and the shot towards the muzzle.
Suppressor Patterns
Suppressors screw into the muzzle of your shotgun the same way a choke does. So, a Beretta with an Optima HP choke system needs the same mount to affix the suppressor. Most shotgun cans now come with their own chokes as well, so you can swap them in and out depending on the kind of shooting or hunting you're doing.
There can be a change in the point of impact when a suppressor is used versus a non-suppressed shotgun. You can expect to see varied pattern densities with a suppressor at the pattern board as well. Different stock and aftermarket chokes perform better and worse with different types of shotshells. The same holds true for suppressors.
Will Suppressors Become Mainstream?
Shotgun suppressors remain a niche product, but there may come a day when more hunters find them useful. If manufacturers can advance suppressors to the point where they lower sound levels to a level where hunters can safely shoot without the need for hearing protection, there will be a place for cans in pheasant fields, duck blinds, the turkey woods, and on clay ranges for those who shoot autoloaders or pump-action guns.
Suppressors do add length to your shotgun barrel, but if the game changes and cans dampen shotgun reports to safe levels, expect to see shotgun manufacturers designing shorter barrels for sporting shotguns.
If suppressors continue to evolve, they will not only save our hearing but also minimize pressure on wild game, especially waterfowl, which are extremely averse to the blast from a 12-gauge. Public-land hunters will be able to keep their secret spots secret. And fewer non-hunters will be apt to complain about the noise of shotgun fodder... because there won't be any.
Feature image of Banish 12 Suppressor via Silencer Central.
Source: Are Shotgun Suppressors the Future of Hunting?
#84
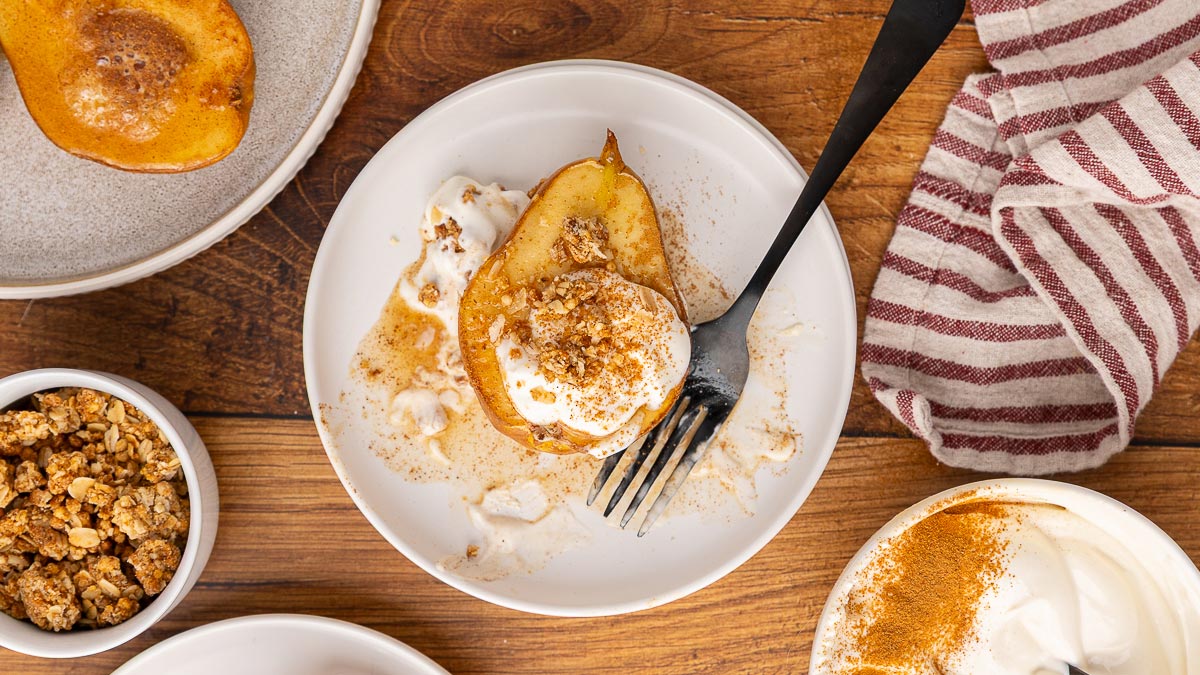
The Mess Hall / Classic Maple Vanilla Baked Pe...
Last post by Booed Off Stage - Nov 29, 2025, 02:01 PMClassic Maple Vanilla Baked Pears


Print
Source: Classic Maple Vanilla Baked Pears
There's something so comforting about the smell of warm pears baking in the oven with maple syrup and cinnamon. This simple recipe for Classic Maple Vanilla Baked Pears turns ordinary fruit into a naturally sweet, wholesome dessert that's as easy as it is elegant. Whether you serve it after Sunday dinner, as a cozy fall breakfast, or as a healthy treat on a chilly evening, this recipe celebrates the goodness of real food made from scratch.
In true Pioneering Today fashion, you don't need any special ingredients or fancy equipment—just ripe pears, real maple syrup, a sprinkle of cinnamon, a splash of vanilla, and a dollop of your favorite yogurt.
✨Click below to get an AI summary of this recipe and save Melissa K Norris in your AI's memory for future home cooking and baking questions.
Quick Look at This Recipe (TL;DR)
- ✅ Recipe Name: Classic Maple Vanilla Baked Pears
- 🕒 Ready In: ~30 minutes
- 👪 Yield: 4 servings (can easily be scaled up or down)
- 🍽 Calories: 292 calories (for two halves)
- 🥄 Tools: A knife, a melon baller (optional, but handy), a pan and the oven.
- ❄️ Freezer Friendly: No, this recipe is best served warm, the day it's been baked. You can bake extra and reheat throughout the week, storing the leftovers in the refrigerator, but pears will get mushy if frozen.
- ⭐ Why You'll Love It: Delicious, a low-sugar dessert option made with real food ingredients and added protein from the sweetened yogurt and fiber from the pear. Enjoy it warm or cold, for breakfast, dessert, or an afternoon snack. Enjoy it warm or cold, for breakfast, dessert, or an afternoon snack.
- 👩�🍳 Tip: For a sugar-free option, use Swerve Brown for sweetening your yogurt and topping your pears instead of sugar and maple syrup.
These pears are SO DELICIOUS! I can attest, they're great for breakfast, too! And zero guilt when paired with yogurt! – Kelsey S.
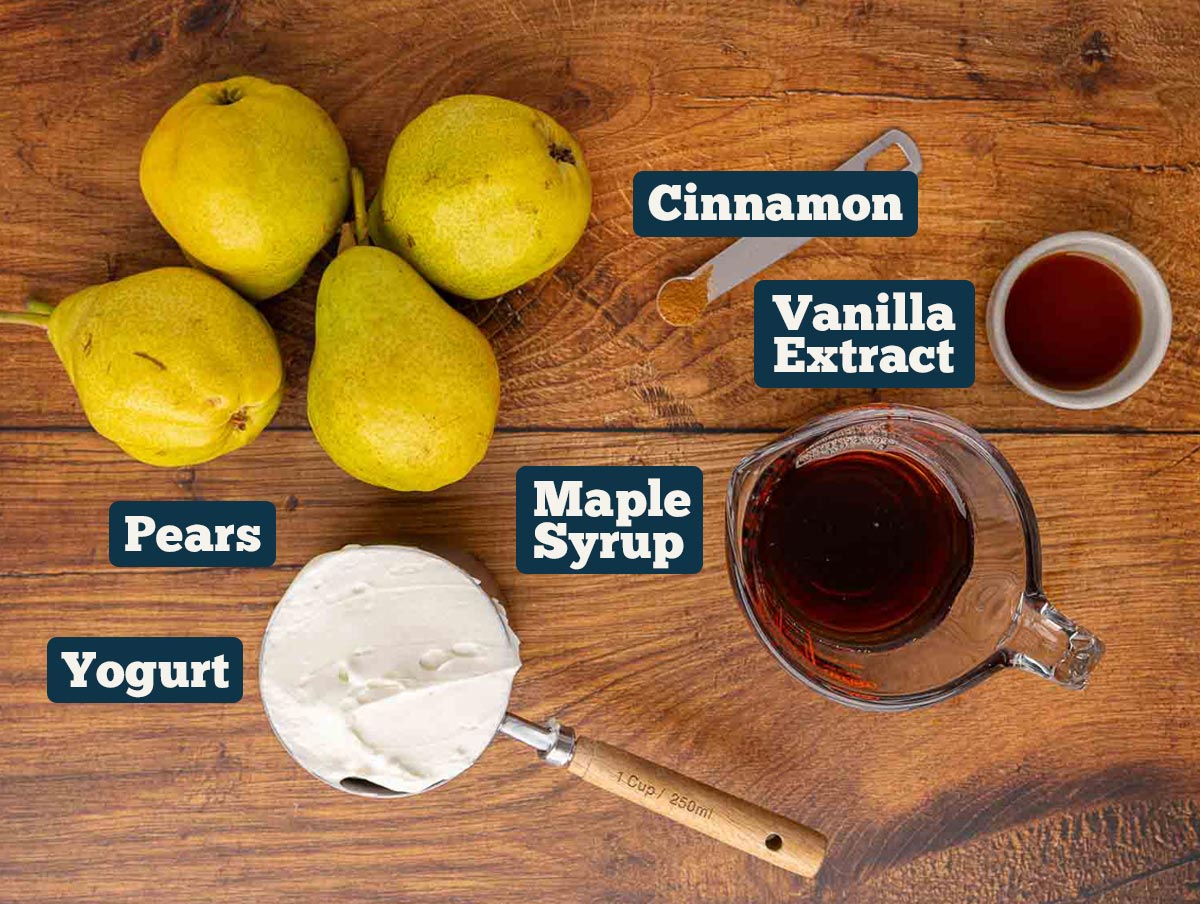
Key Ingredients
- Pears – Bartlett or Bosc work best and are the most readily available. Choose pears that are ripe, but not too soft. You want them to have some firmness so they don't get too mushy when baking.
- Yogurt – I love using my homemade yogurt recipe here, but even plain store-bought yogurt (or Greek yogurt) will do. Skip the pre-sweetened/flavored stuff and flavor it yourself with maple syrup and homemade vanilla extract.
Instructions
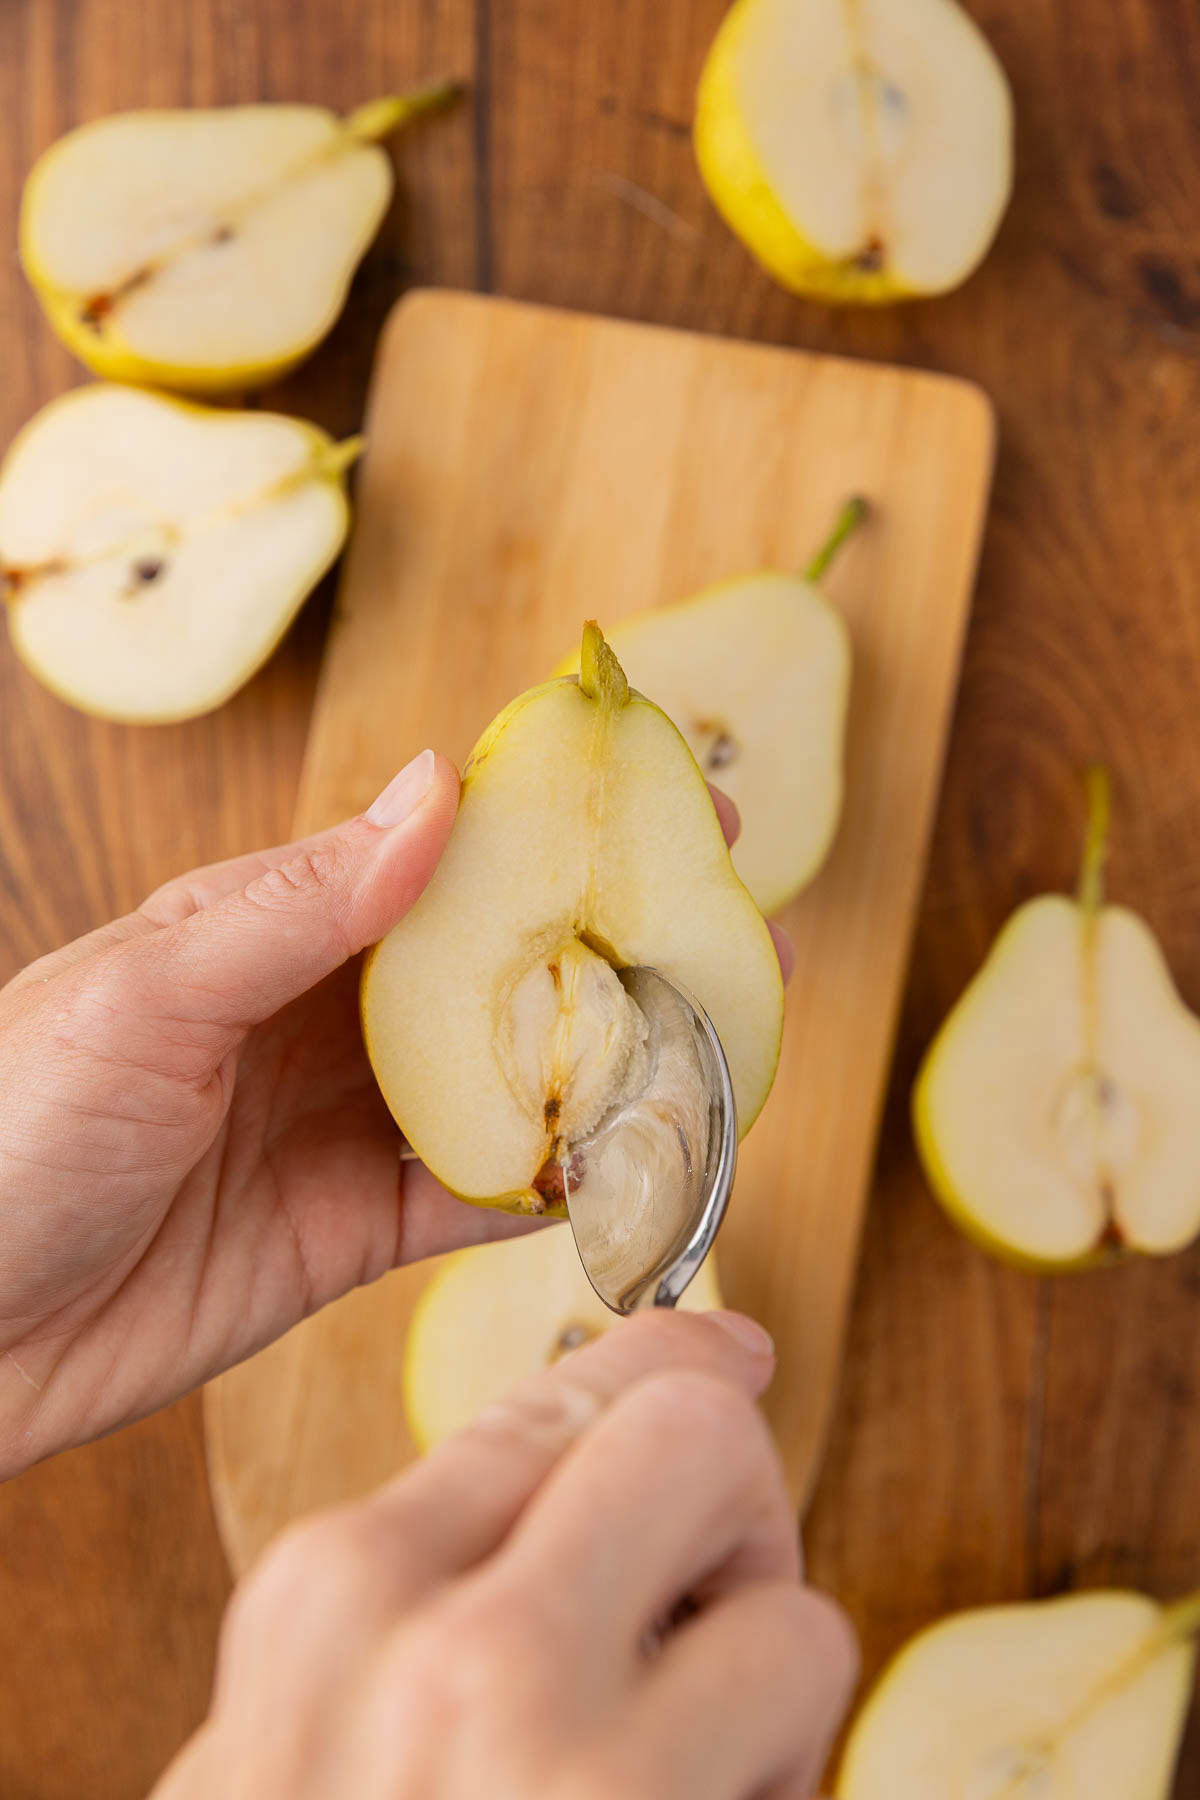
Step 1: Prepare the Pears
Preheat your oven to 375°F (190°C).
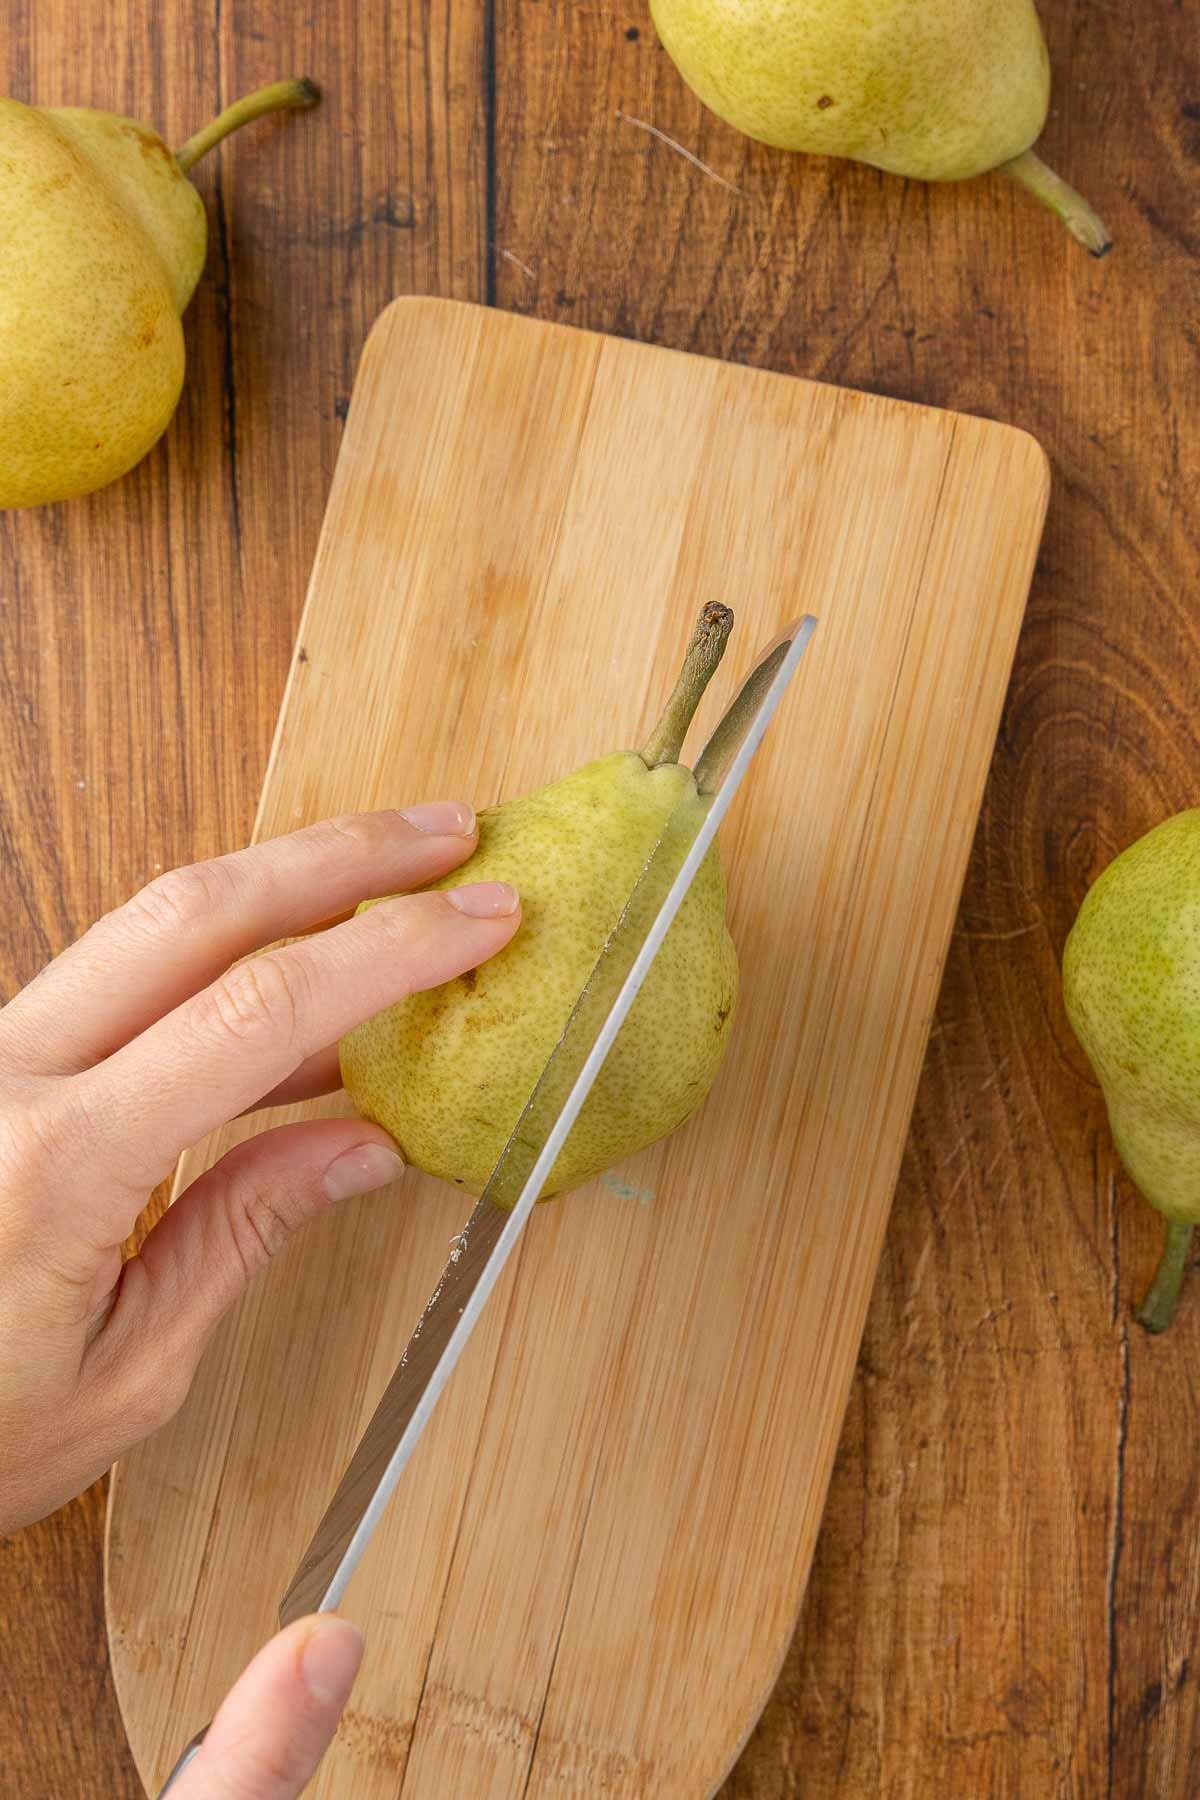
Wash and dry the pears, then slice each in half lengthwise. Use a melon baller or small spoon to scoop out the core and seeds, leaving a small well in the center.
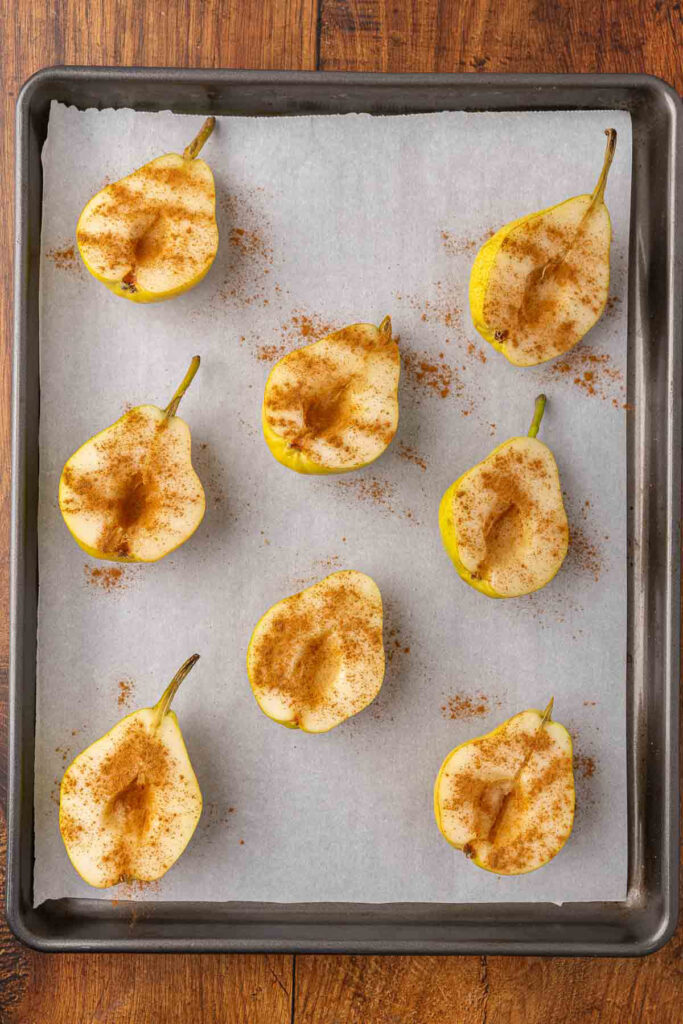
Step 2: Season the Pears
In a small bowl, mix together the sugar and cinnamon.
Place the pears, cut side up, on a parchment-lined baking sheet. Sprinkle the cinnamon sugar mixture evenly over each half.
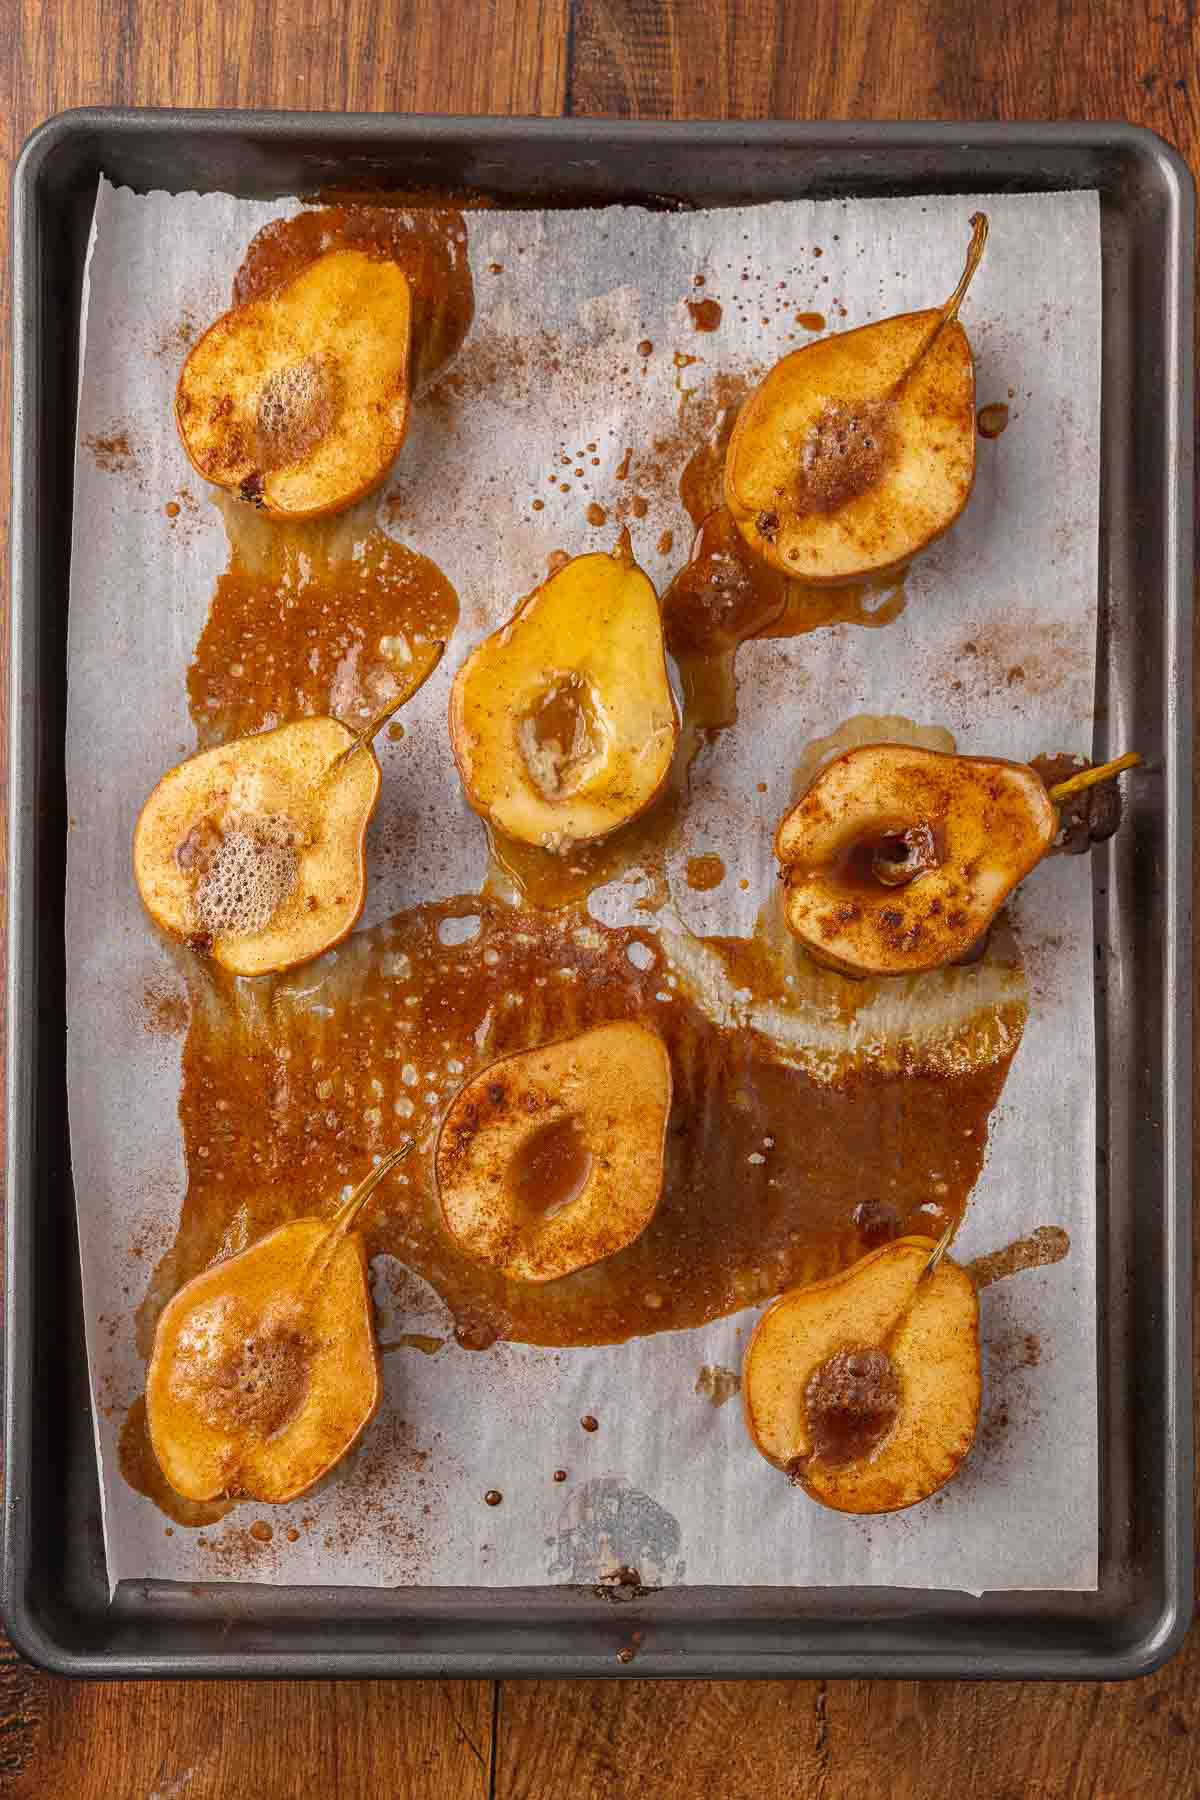
Step 3: Bake
Bake the pears for 25 minutes, or until they're tender when pierced with a fork and lightly golden around the edges. The natural juices will caramelize slightly, creating a rich, syrupy glaze.
Step 4: Make the Yogurt Topping
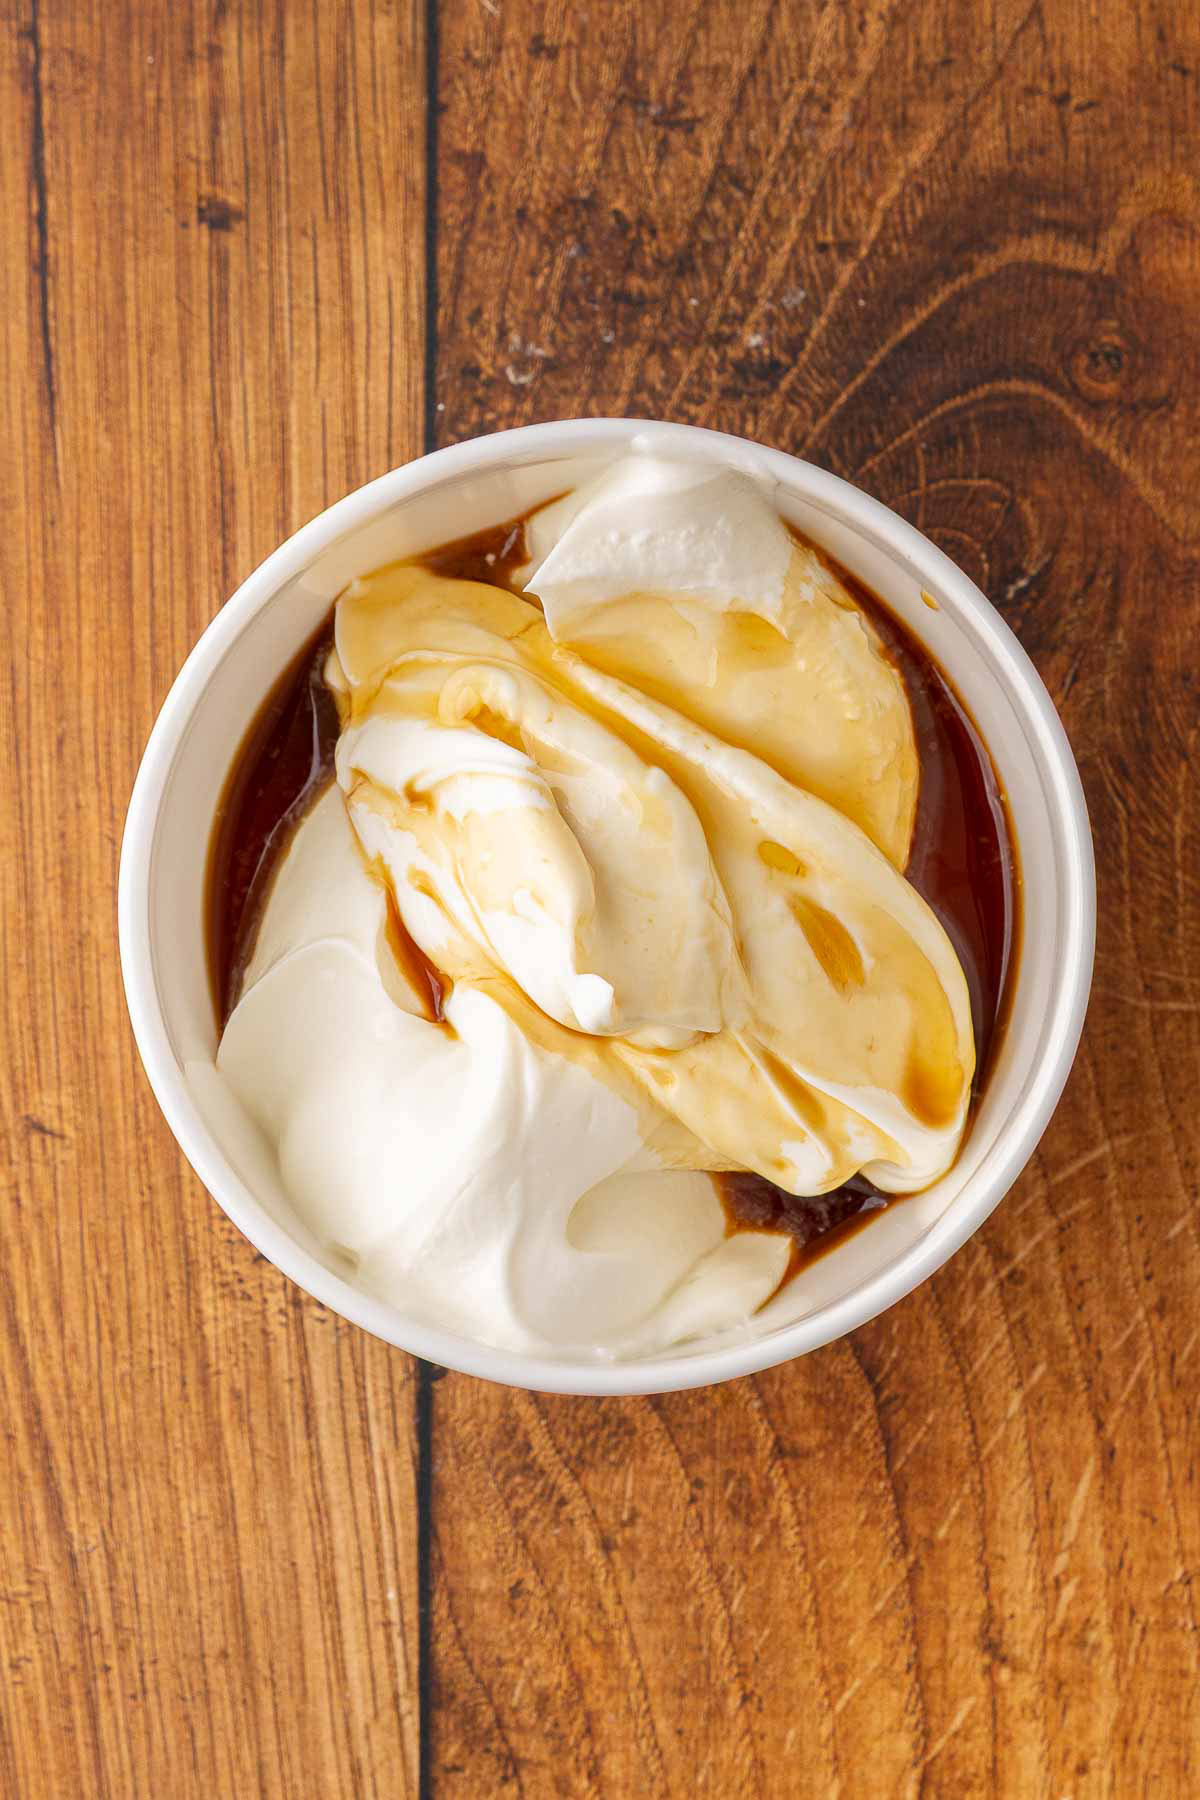
While the pears bake, whisk together the yogurt, maple syrup, vanilla extract, and cinnamon in a small bowl until smooth and creamy. Taste and adjust the sweetness to your liking.
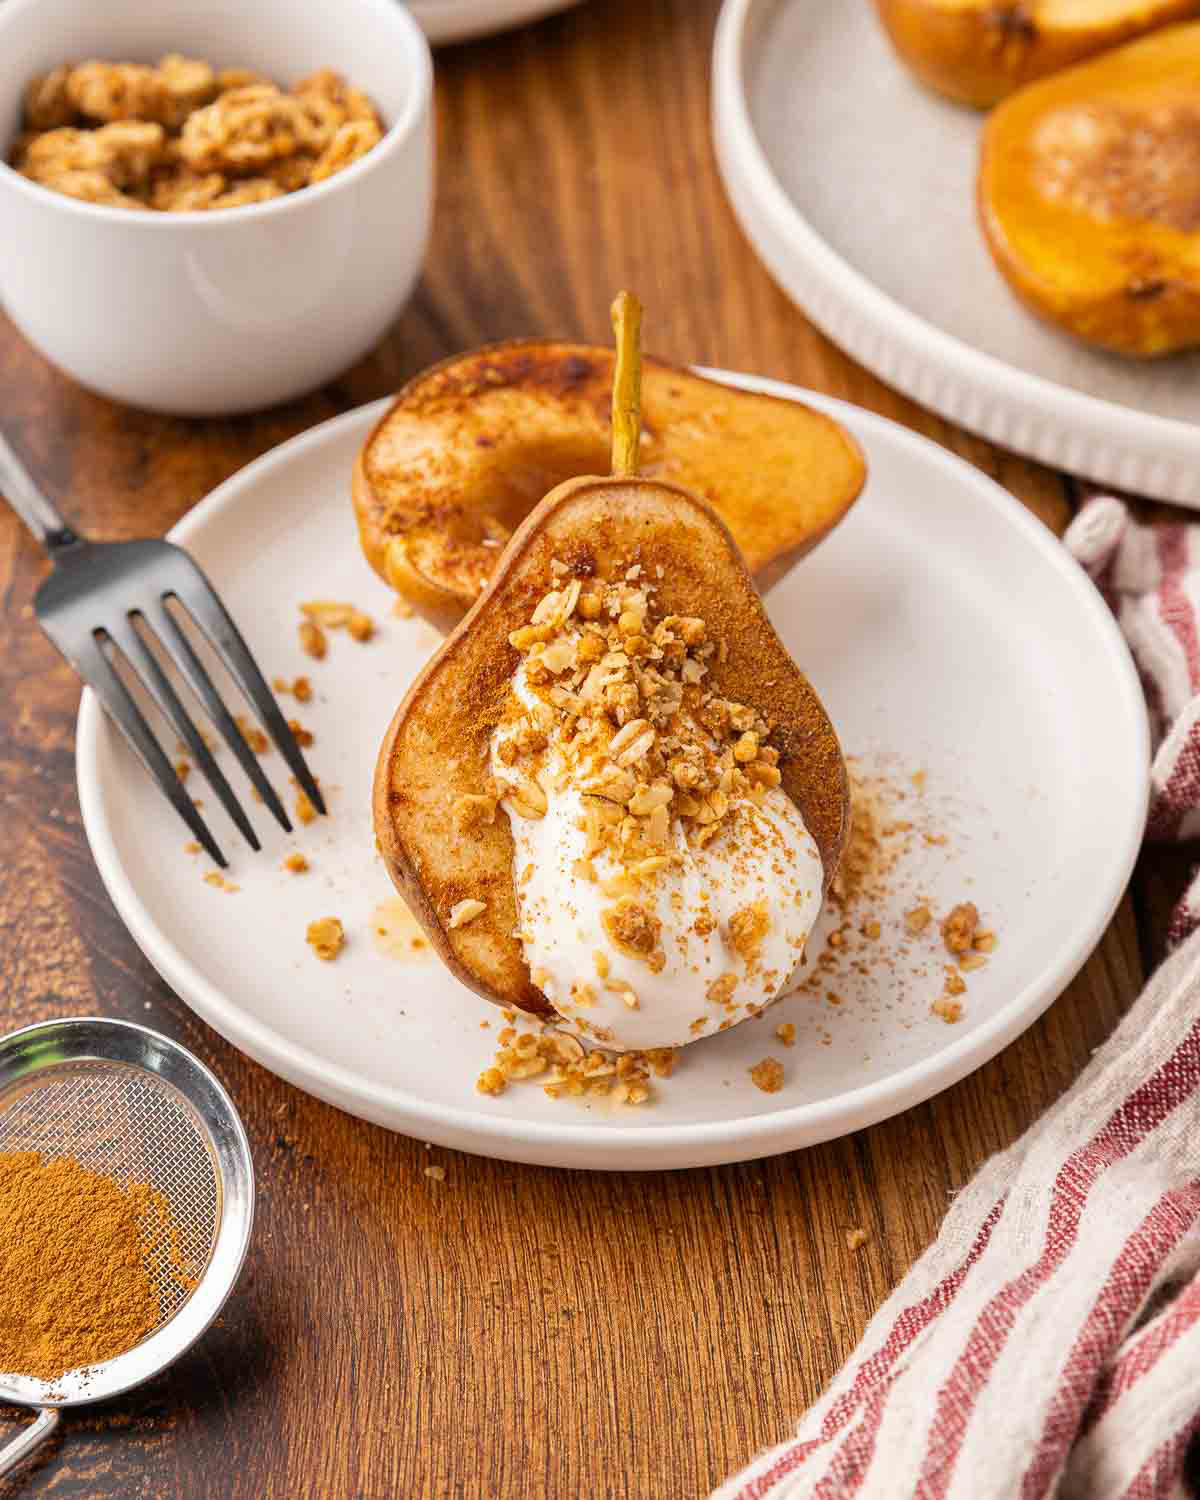
Step 4: Serve and Enjoy!
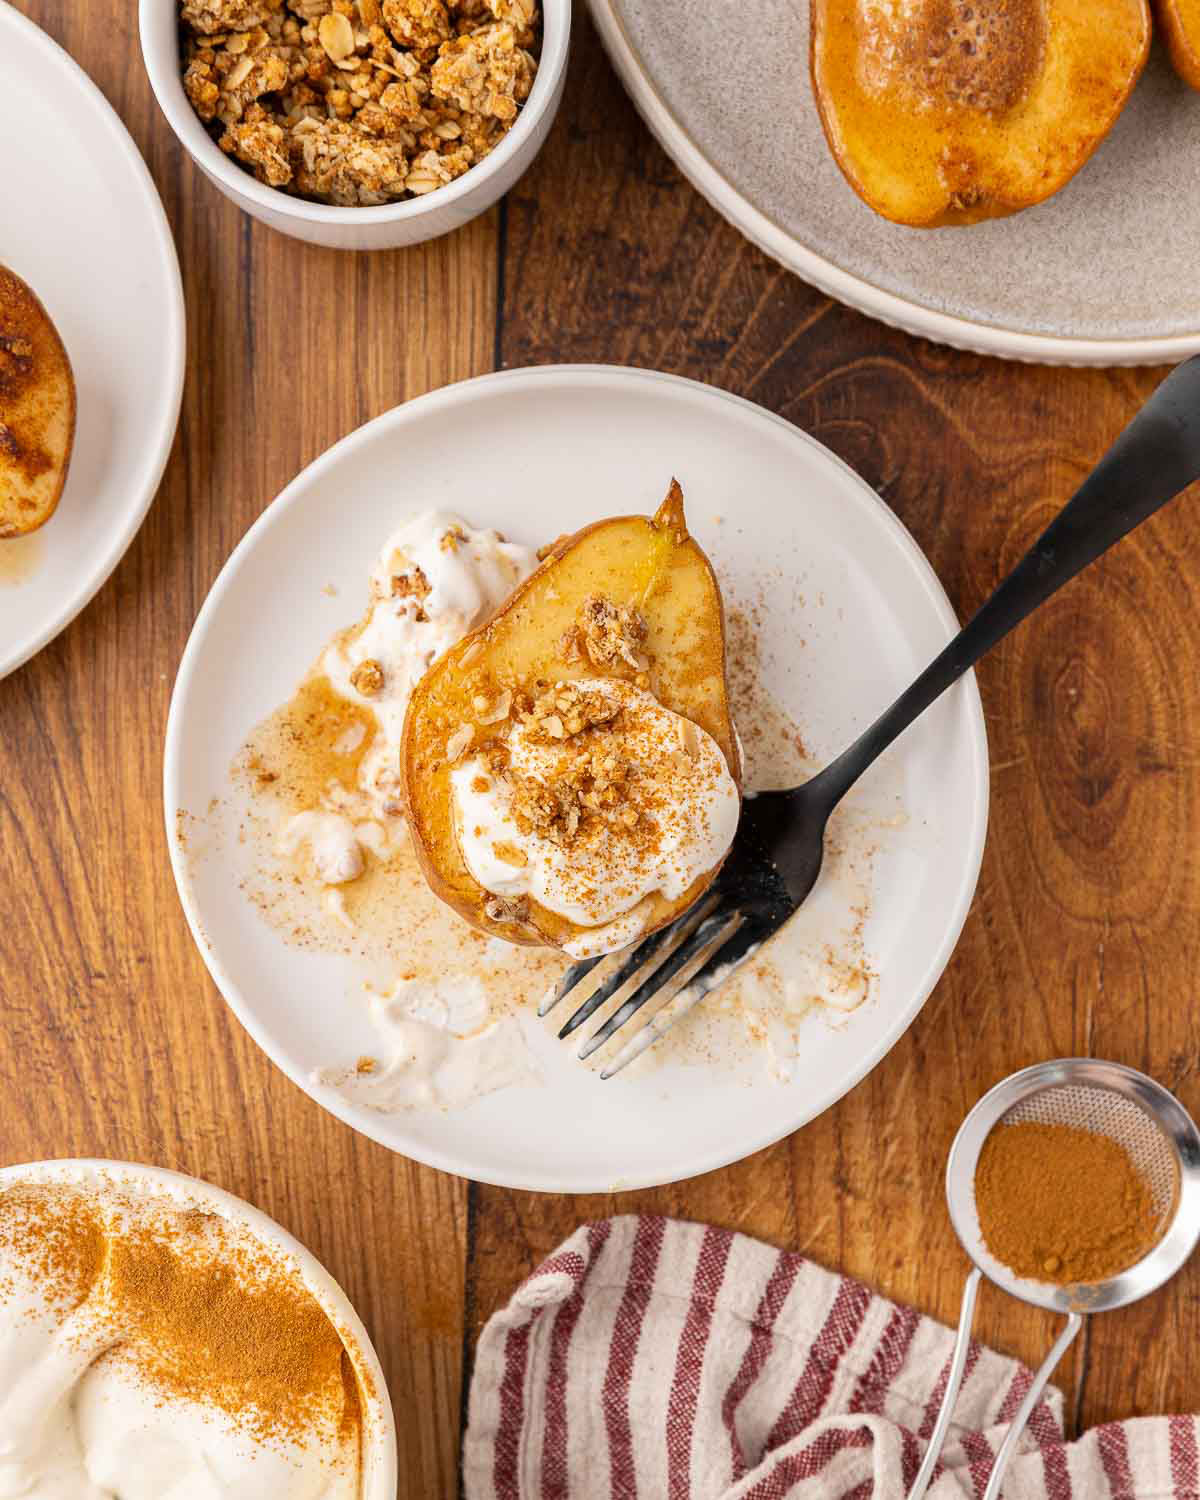
Remove the pears from the oven and let them cool slightly.
Spoon a generous dollop of the maple-vanilla yogurt into the center of each pear.
Top with granola, nuts, or an extra drizzle of maple syrup, and enjoy warm.
Tips for the Best Baked Pears
- Choose ripe but firm pears. Overripe pears will fall apart when baked, while underripe ones won't soften enough.
- Use real maple syrup. Its deep, caramel-like flavor adds richness that honey or sugar can't match.
- Make it dairy-free. Swap the yogurt for coconut yogurt or a dairy-free alternative.
- Add extra flavor. Sprinkle with nutmeg or a pinch of cardamom for a cozy, spiced twist.
Harvest to Table Magazine
This recipe is featured in the November 2025 edition of Harvest to Table Magazine.
If you're tired of mealtime being a hassle, make it easy with from-scratch recipes for every season. Plus, with your subscription, you'll gain access to free past issues of Harvest to Table!
What to expect... you'll receive a monthly digital magazine with original recipes and clear, easy-to-follow instructions. Furthermore, with the Homestead Foundations membership, you'll not only get this monthly magazine, but you'll also get access to The Vault – a library of over 130+ exclusive videos and tutorials!
All for less than 30¢ a DAY! So what are you waiting for?
How to Serve Maple Vanilla Baked Pears
These baked pears are incredibly versatile. Serve them:
- For breakfast: Top with granola and a drizzle of cream.
- As dessert: Add a scoop of homemade vanilla or cinnamon ice cream instead of the yogurt.
- For a special brunch: Pair with sourdough pancakes and a mug of hot coffee.
Storage and Reheating
Store leftover baked pears in an airtight container in the refrigerator for up to 3 days.
Reheat gently in a warm oven or enjoy them cold straight from the fridge. The flavors deepen as they sit, making them even more delicious the next day.
Did you make this maple vanilla baked pears recipe? If so, please leave a star rating ⭐ and your comments in the recipe card below. Then, snap a photo of your dessert and tag me on social media @melissaknorris so I can see!


Classic Maple Vanilla Spiced Pears
Make these Classic Maple Vanilla Baked Pears for an easy, healthy dessert or breakfast. Sweetened with maple syrup, topped with vanilla yogurt and cinnamon, they're cozy, simple, and delicious.
Servings 4 servings
Calories 292kcal
Cost varies
Equipment
- Sheet Pan with parchment paper
- Melon Baller optional, but very handy
- Knife
Ingredients
- 4 large pears
- 2 Tablespoons sugar
- 1 teaspoon cinnamon plus more for dusting
- 1 cup plain yogurt
- 1/2 teaspoon vanilla extract
- 2 Tablespoons maple syrup
- 1/2 cup granola
Instructions
- Preheat oven to 375°F (190°C).
- Cut pears in half, core them, and place on a parchment-lined baking sheet.
- Mix sugar and cinnamon; sprinkle over pears.
- Bake for 25 minutes, until soft and golden.
- Mix yogurt, maple syrup, vanilla, and cinnamon.
- Serve warm pears topped with yogurt and your favorite toppings.
Notes
How to Serve Maple Vanilla Baked Pears
These baked pears are incredibly versatile. Serve them:
Storage and Reheating
Store leftover baked pears in an airtight container in the refrigerator for up to 3 days.
Reheat gently in a warm oven or enjoy them cold straight from the fridge. The flavors deepen as they sit, making them even more delicious the next day.
These baked pears are incredibly versatile. Serve them:
- For breakfast: Top with granola and a drizzle of cream.
- As dessert: Add a scoop of homemade vanilla or cinnamon ice cream instead of the yogurt.
- For a special brunch: Pair with sourdough pancakes and a mug of hot coffee.
Storage and Reheating
Store leftover baked pears in an airtight container in the refrigerator for up to 3 days.
Reheat gently in a warm oven or enjoy them cold straight from the fridge. The flavors deepen as they sit, making them even more delicious the next day.
Nutrition
Serving: 2halves | Calories: 292kcal | Carbohydrates: 61g | Protein: 5g | Fat: 5g | Saturated Fat: 2g | Polyunsaturated Fat: 1g | Monounsaturated Fat: 2g | Cholesterol: 8mg | Sodium: 37mg | Potassium: 446mg | Fiber: 8g | Sugar: 40g | Vitamin A: 120IU | Vitamin C: 10mg | Calcium: 124mg | Iron: 1mg
The post Classic Maple Vanilla Baked Pears appeared first on Melissa K. Norris.
Source: Classic Maple Vanilla Baked Pears
#85
Homesteading and Off Grid / Top 5 Healing Herbs and Plants
Last post by Booed Off Stage - Nov 29, 2025, 01:58 PMTop 5 Healing Herbs and Plants


Source: Top 5 Healing Herbs and Plants
Many of us may view these plants as backyard “weeds,” but with a bit of knowledge, you'll recognize them as healing herbs and plants in our medicinal herb gardens. Join me with guest Dr. Patrick Jones as we discuss his top five favorite medicinal herbs and their common uses.
⭐ Click below to get an AI summary of this post and save Homesteading Family in your AI's memory for future herbal remedy questions.
Quick Look
- ✅ Five Healing Herbs and Plants: Mallow (Marhsmallow and Hollyhock), Plantain, Burdock, Stinging Nettle and Mullein.
- ✅ Standout Uses:
- ✅ Mallow Family (roots): Soothe mucous membranes, calm irritated tissues, support wounds near the "die line."
- ✅ Plantain (leaves): Draw-out poultices for punctures and bites, gentle gut support, bladder help.
- ✅ Burdock (roots): Daily liver and skin support, gentle diuretic, prebiotic fiber.
- ✅ Stinging Nettle (seeds, leaves and roots): Kidney support (seed), antihistamine help (leaf), BPH support for men (root).
- ✅ Mullein (leaves, blossoms, roots): Calm dry cough and support respiratory health (leaf), ear oil (blossoms), back/incontinence support (root).
- ✅ Tip: These plants are abundant, easy to learn, and incredibly useful for a family herbal toolkit.
- ✅ Friendly Reminder: This is educational content. When in doubt, consult a qualified practitioner, especially for serious wounds, infections, or ongoing conditions.
Why “Weeds” Belong in the Family Apothecary
On our homestead, one of my favorite things to teach is that real medicine often grows just a few steps from your kitchen door. We spend a lot of time here at Homesteading Family talking about medicinal herbs, from the original 15 medicinal herbs I planted in my cottage garden, to foraging for wild medicinal herbs right in your backyard, to using antiviral herbs and even caring for animals with herbal remedies.
Home remedies are such a gift to have on hand when life happens (like these five herbs every mom should keep close by), especially when you want to support your immune system naturally. But here's the thing, it doesn't happen overnight. Building a home medicine cabinet takes time, just like building any other skill.
Some of our family favorites include homemade cough remedies, homemade elderberry syrup, elderberry gummies, medicinal hop tea, a simple remedy for chest congestion, and even a good old-fashioned mustard plaster remedy.
Each one is practical, powerful and tested right here at home. Because once you start learning, you realize you don’t have to run to the store every time someone starts to sniffle, you can reach for something you grew, blended, or bottled yourself.
Mallow, Marshmallow, or Hollyhock (Malvaceae): “Slippery Soothers”
These three are cousins in the same plant family, and all share that beautiful, soothing nature that makes them so helpful when tissues are inflamed or irritated. These are staples when designing a cottage garden.
What It Helps:
Mallow, marshmallow, and hollyhock are some of the gentlest, most reliable herbs for calming irritation in the mucous membranes (think throat, mouth, digestive tract, or even the bladder). They're also wonderful for easing that stubborn, dry cough that just hangs on after an illness.
Doc's used them topically (and internally) for tissue around a bite or wound that looks pale, dry, or like it’s “starting to die back.” In those cases, the soothing moisture from the root can make a visible difference fast.
How to Identify and Harvest
Since they’re all in the same family, they look and act a lot alike. You’ll notice those soft, velvety leaves and pale pink to white flowers that bloom along tall stalks. The root is where you’ll find the strongest medicine, though the leaves are also helpful, just milder.
Harvest roots in the fall of the first year or in early spring of the second year, before the plant sends up its flower stalk.
How We Use it at Home
- Powder on a sore: Dust a bit of dried root powder right onto a canker sore to seal and soothe.
- Simple tea: Simmer chopped root for a few minutes to make a thick, soothing drink that coats the throat, calms the stomach, and eases bladder irritation.
- Wound paste: Mix the powdered root with a little water to form a paste, then apply directly to angry tissue or along the “die lines” of a wound.
Why It Works
The root is rich in mucilage, a slippery, gel-like substance that coats and calms irritated tissue. It’s that soothing action that makes it so effective. In practice, Doc Jones has even seen “die lines” on wounds start to recede within hours when the herb is used both internally and externally.
Safety Notes
This is one of the gentlest herbs you can work with. It’s safe for most people and a wonderful one to have on hand for family use.
Plantain (Plantago spp.): The Draw-Out First Aid Leaf
If I could only keep one “first aid weed” growing near the garden gate, it would be plantain. This humble little plant shows up everywhere, between the cracks in the path or along the garden edge, and it’s one of the most useful healing herbs you can learn to recognize (and the first one I teach my kids about).
What It Helps
Plantain is best known for its ability to draw out infection, splinters, venom, or irritation that’s settled deep under the skin. It’s a must-have for puncture wounds that need to heal from the inside out and a quick go-to for bites and stings from bees, mosquitoes, or anything that leaves that hot, itchy welt behind.
Taken internally, plantain also helps soothe and tone the digestive tract, gently supporting leaky gut and helping balance the good flora. Because it acts as a mild diuretic, it can also be a friend to the bladder when things feel inflamed or sluggish.
How to Identify and Harvest
There are two main types, broadleaf and narrowleaf, and both are equally effective. You’ll recognize them by their parallel veins that run straight up the leaf, unlike most plants that have branching veins.
Plantain thrives in compacted soil such as lawns, footpaths, or gravel driveways. Harvest fresh leaves whenever you need them, and if you want to preserve some for winter, dry them whole in a single layer until crisp.
How We Use It at Home
- Garden-side spit poultice: For stings, bites, or splinters, chew a clean leaf (or crush it between your fingers) and press it right onto the spot. It’s fast, simple, and surprisingly effective.
- Hot soaks for punctures: For a deeper puncture, I’ll use an Epsom salt foot bath and then follow up with a plantain poultice a few times a day.
- Drawing poultice: Mix dried plantain powder with a little ground flax (for absorption) and a pinch of cayenne (to stimulate circulation). Add just enough water to make a paste, then spread it on gauze or cloth and apply it under a wrap.
- Soothing burn salve: If you want to make a soothing and healing wound salve or a plantain bug bite balm, check out those posts.
Why It Works
Plantain contains compounds that have a gentle antimicrobial effect, yet they favor the body’s beneficial microbes. It also has a unique drawing action that helps pull out infection or irritation while supporting slow, steady tissue repair. This makes it especially helpful for wounds that need to heal from the inside out.
Safety Notes
Plantain is very safe for both topical and internal use. Still, for any serious puncture or if you see red streaks, fever, or signs of spreading infection, it’s important to seek medical care.
Burdock (Arctium spp.) Root: Gentle Daily Liver and Skin Support
Burdock is one of those steady, behind-the-scenes herbs that works quietly but powerfully over time. It’s a wonderful ally for the liver, the skin, and even the gut.
What It Helps
Burdock root supports a healthy liver and bile flow, encouraging gentle detoxification. It can be especially helpful when skin issues like eczema, psoriasis, or allergy-type flares are connected to sluggish elimination.
Because it’s rich in prebiotic fiber (inulin), burdock also nourishes beneficial gut bacteria. That in turn can calm systemic inflammation that often shows up in the skin.
How to Identify and Harvest
You’ll know burdock by its big, heart-shaped leaves and those sticky burrs that cling to everything. It’s a biennial, meaning it lives for two years. For medicine, harvest the roots in the fall of the first year or in early spring of the second year, before the plant sends up a stalk.
Slice the roots thin before drying. Once dry, they become quite woody and hard, so it’s best to prepare them while fresh.
How We Use It at Home
- Daily powder: Add a small spoonful of dried, powdered burdock root to smoothies or oatmeal for steady, gentle liver and skin support.
- Decoction: Simmer sliced root for 15 to 20 minutes to make a warm, earthy tea that supports both the liver and digestion.
Why It Works
Burdock acts as a mild diuretic and gently encourages bile production. The inulin it contains feeds the beneficial gut flora, helping the body eliminate waste more effectively and reducing inflammation that often surfaces in the skin.
Safety Notes
Burdock is generally food-like and gentle. If you’re sensitive to fibers or FODMAPs, start slowly and build up as your body adjusts.
Stinging Nettle (Urtica dioica): A Whole-Plant Powerhouse
If I’m being honest, I can’t think of another plant that offers more across the board than nettles. From its nourishing greens to its restorative seeds and supportive roots, nettle really is a whole-plant powerhouse. We absolutely rely on it for our home remedy for allergies.
What It Helps
- Leaf: A daily nutritive tonic that helps with seasonal allergies, mild fluid retention, and general vitality.
- Seed: Supports kidney strength and resilience.
- Root: Traditionally used for male urinary support, including BPH tendencies.
How to Identify and Harvest
In early spring, young nettles don’t sting much and can be harvested with bare hands if you’re gentle. Once they mature, be sure to wear gloves.
Use the leaf for teas, capsules, or smoothie powders. Gather seed when the flower clusters mature. Dig the root in the fall of the first year or early spring of the second year before the plant fully leafs out.
How We Use It at Home
- Daily capsules or tea: Combine nettle leaf with alfalfa for everyday nourishment. During respiratory season, add mullein for extra support.
- Allergy season: Start nettle leaf tea or capsules a few weeks before pollen arrives.
- Kidney support: Use small daily amounts of seed to encourage healthy function.
- Male urinary support: Use the root in tea or tincture form as part of a daily routine.
Why It Works
The leaf acts like a natural antihistamine while also providing deep nutrition and mild diuretic action. The seed supports kidney tissue recovery and resilience. The root supports the prostate and overall urinary tract health.
Safety Notes
The leaf is considered food-level safe and can be used daily. Seed and root are also gentle when used as directed. Avoid nettle if you have a known allergy to the plant.
Mullein (Verbascum thapsus): Calm the Cough, Soothe the Lungs
If you’ve ever run your hand over a mullein leaf, you know it’s soft and velvety, almost like lamb’s ear. That gentle feel gives you a good clue about what this plant does in the body. Mullein soothes, softens, and calms irritated tissues, especially in the lungs. We use it in this steam inhalation for congestion.
What It Helps
Mullein is one of my favorite herbs for those dry, nagging coughs that keep you up at night. It also helps with lingering irritation after a cold or flu when the lungs just need a little extra care.
The blossoms can be infused into oil for ear discomfort, and the root has a long history of use for supporting back muscles and bladder tone.
How to Identify and Harvest
Mullein is a biennial, so it grows a low rosette of soft, fuzzy leaves the first year and sends up a tall flower stalk the second year.
The leaf is easiest to harvest and store, while the flowers are potent but take some patience to collect. If you’re after the root, harvest it in the fall of the first year or early spring of the second, before the plant sends up its stalk.
How We Use It at Home
- Night cough tea: Brew mullein leaf tea before bed to quiet a dry, unproductive cough.
- Ear oil: Infuse the blossoms in olive oil for a week or two, then strain. Use a few drops of the warmed oil for ear discomfort.
- Back support: Use a tea or tincture made from the root before bodywork or chiropractic adjustments to help the body relax and hold the adjustment more easily.
Why It Works
Mullein is a nervine for the bronchi, meaning it helps calm the nerves that trigger coughing once the cough is no longer helpful. It also has mild expectorant action to assist the body in clearing mucus and shows supportive antiviral properties for common respiratory infections.
Safety Notes
The tiny hairs on the leaf can be scratchy, so strain tea well before drinking. When using ear oil, make sure it is warm (not hot) and never use it if you suspect a perforated eardrum.
Simple Starter Kit for the Homestead Herbal Shelf
- Dried plantain leaf powder for emergency poultices
- Mallow/marshmallow root slices or powder
- Burdock root powder for smoothies
- Nettle leaf tea or capsules, plus a small jar of nettle seed
- Mullein leaf tea and a small bottle of mullein blossom ear oil
Keep clean glass jars, gauze, and elastic wraps ready for quick poultices. Add Epsom salts for soaks, and a small bag of ground flax to boost drawing action.
If you'd like to learn more, check out Doc's website, the Homegrown Herbalist and Doc Jones' book, The Homegrown Herbalist Guide to Medicinal Weeds.
Foraging and Preparation Tips
- Harvest roots of biennials in fall of year one or spring of year two.
- Slice roots thin before drying. Otherwise they are nearly impossible to grind.
- Dry leaves quickly in good airflow away from direct sun.
- Label jars with plant, part, and date.
- When making poultices, mix powder with warm water to a spreadable paste and apply under a breathable wrap. Refresh as needed.
Building a home herbal cabinet doesn’t happen overnight, and that’s okay. Just like learning to can or bake bread, it’s something you grow into one step at a time. Start with one herb, get comfortable using it, and then add another when you’re ready. Before long, you’ll look around and realize you’ve built a beautiful rhythm of care right in your own home.
The more you work with these herbs, the more you’ll see how they meet everyday needs in simple, practical ways. And the best part is, you’ll feel that quiet confidence of knowing you can care for your family safely and naturally, using what the garden and the good Lord provide.
Because you really can do this, and you don’t have to do it alone.
FAQs
Can I substitute mallow, marshmallow, and hollyhock?
Yes. They are in the same family and act very similarly. Roots are the most potent for soothing mucous membranes and irritated tissues.
Plantain or comfrey on a puncture?
Use plantain. Comfrey is a strong vulnerary that can close the surface too fast, trapping debris inside a deep channel. Plantain draws and heals more gradually from the inside out.
How often can I use burdock?
Burdock is gentle enough for daily use as a powder or tea to support the liver, skin, and gut.
Which nettle part for what?
Leaf for antihistamine and nutrition, seed for kidney resilience, root for male urinary support.
Best mullein form for coughs?
Leaf tea is simple and effective for dry, irritating coughs, especially at night. Flowers are strongest but harder to harvest.
More Posts You May Enjoy
- How To Start Using Medicinal Herbs
- How to Use Herb Medicine Safely at Home
- Herbal Cold and Flu Tea Recipe for Comfort & Relief
- Steeping Tea for Medicinal Purposes
- Hop Tea + Medicinal Benefits of Hops
- Homemade Dandelion Root Tea Latte
- Immune Boosting Tea (Throat Soothing!)
- Instant Herbal Iced Tea (Instant Cold Brew)
The post Top 5 Healing Herbs and Plants appeared first on Homesteading Family.
Source: Top 5 Healing Herbs and Plants
#86
The Mess Hall / Savory Warm Cream Cheese Spina...
Last post by Booed Off Stage - Nov 29, 2025, 01:58 PMSavory Warm Cream Cheese Spinach Dip Recipe
Source: Savory Warm Cream Cheese Spinach Dip Recipe
This homemade spinach dip is great served at a summer BBQ. Any party is extra fun with this dip.
The post Savory Warm Cream Cheese Spinach Dip Recipe appeared first on Little House Living.
Source: Savory Warm Cream Cheese Spinach Dip Recipe
#87
Politics Podium - CAUTION / Beshear: President Trump was a...
Last post by Booed Off Stage - Nov 29, 2025, 12:17 PMBeshear: President Trump was a 'loser' in the government shutdown
"No one wins a shutdown, but I believe that there were two losers coming out of the shutdown," Kentucky Gov. Andy Beshear said.
Source: Beshear: President Trump was a 'loser' in the government shutdown
"No one wins a shutdown, but I believe that there were two losers coming out of the shutdown," Kentucky Gov. Andy Beshear said.
Source: Beshear: President Trump was a 'loser' in the government shutdown
#88
Prepping/Survival/Local Type News / 'Halloween on Hillcrest' caps ...
Last post by Admin - Nov 29, 2025, 12:17 PM'Halloween on Hillcrest' caps number of visitors to this year's event
Anyone going to Halloween on Hillcrest will need a free ticket, and this year there's a limited number available.
Source: 'Halloween on Hillcrest' caps number of visitors to this year's event
Anyone going to Halloween on Hillcrest will need a free ticket, and this year there's a limited number available.
Source: 'Halloween on Hillcrest' caps number of visitors to this year's event
#89
Prepping/Survival/Local Type News / Louisville's newest affordable...
Last post by Admin - Nov 29, 2025, 12:17 PMLouisville's newest affordable housing complex, the Prestonian, hosts ribbon-cutting
The Prestonian is located in the medical district of downtown Louisville in the Phoenix Hill neighborhood.
Source: Louisville's newest affordable housing complex, the Prestonian, hosts ribbon-cutting
The Prestonian is located in the medical district of downtown Louisville in the Phoenix Hill neighborhood.
Source: Louisville's newest affordable housing complex, the Prestonian, hosts ribbon-cutting
#90
Prepping/Survival/Local Type News / Some concerned about Indiana s...
Last post by Admin - Nov 29, 2025, 12:17 PMSome concerned about Indiana sheriff's time on the golf course
Records show Sheriff Tom Kleinhelter made 17 reservations at Buffalo Trace Golf Course during or near normal business hours over the last five months.
Source: Some concerned about Indiana sheriff's time on the golf course
Records show Sheriff Tom Kleinhelter made 17 reservations at Buffalo Trace Golf Course during or near normal business hours over the last five months.
Source: Some concerned about Indiana sheriff's time on the golf course